
This post may contain affiliate links. As an Amazon Associate, I earn from qualifying purchases. Please read my disclosure.
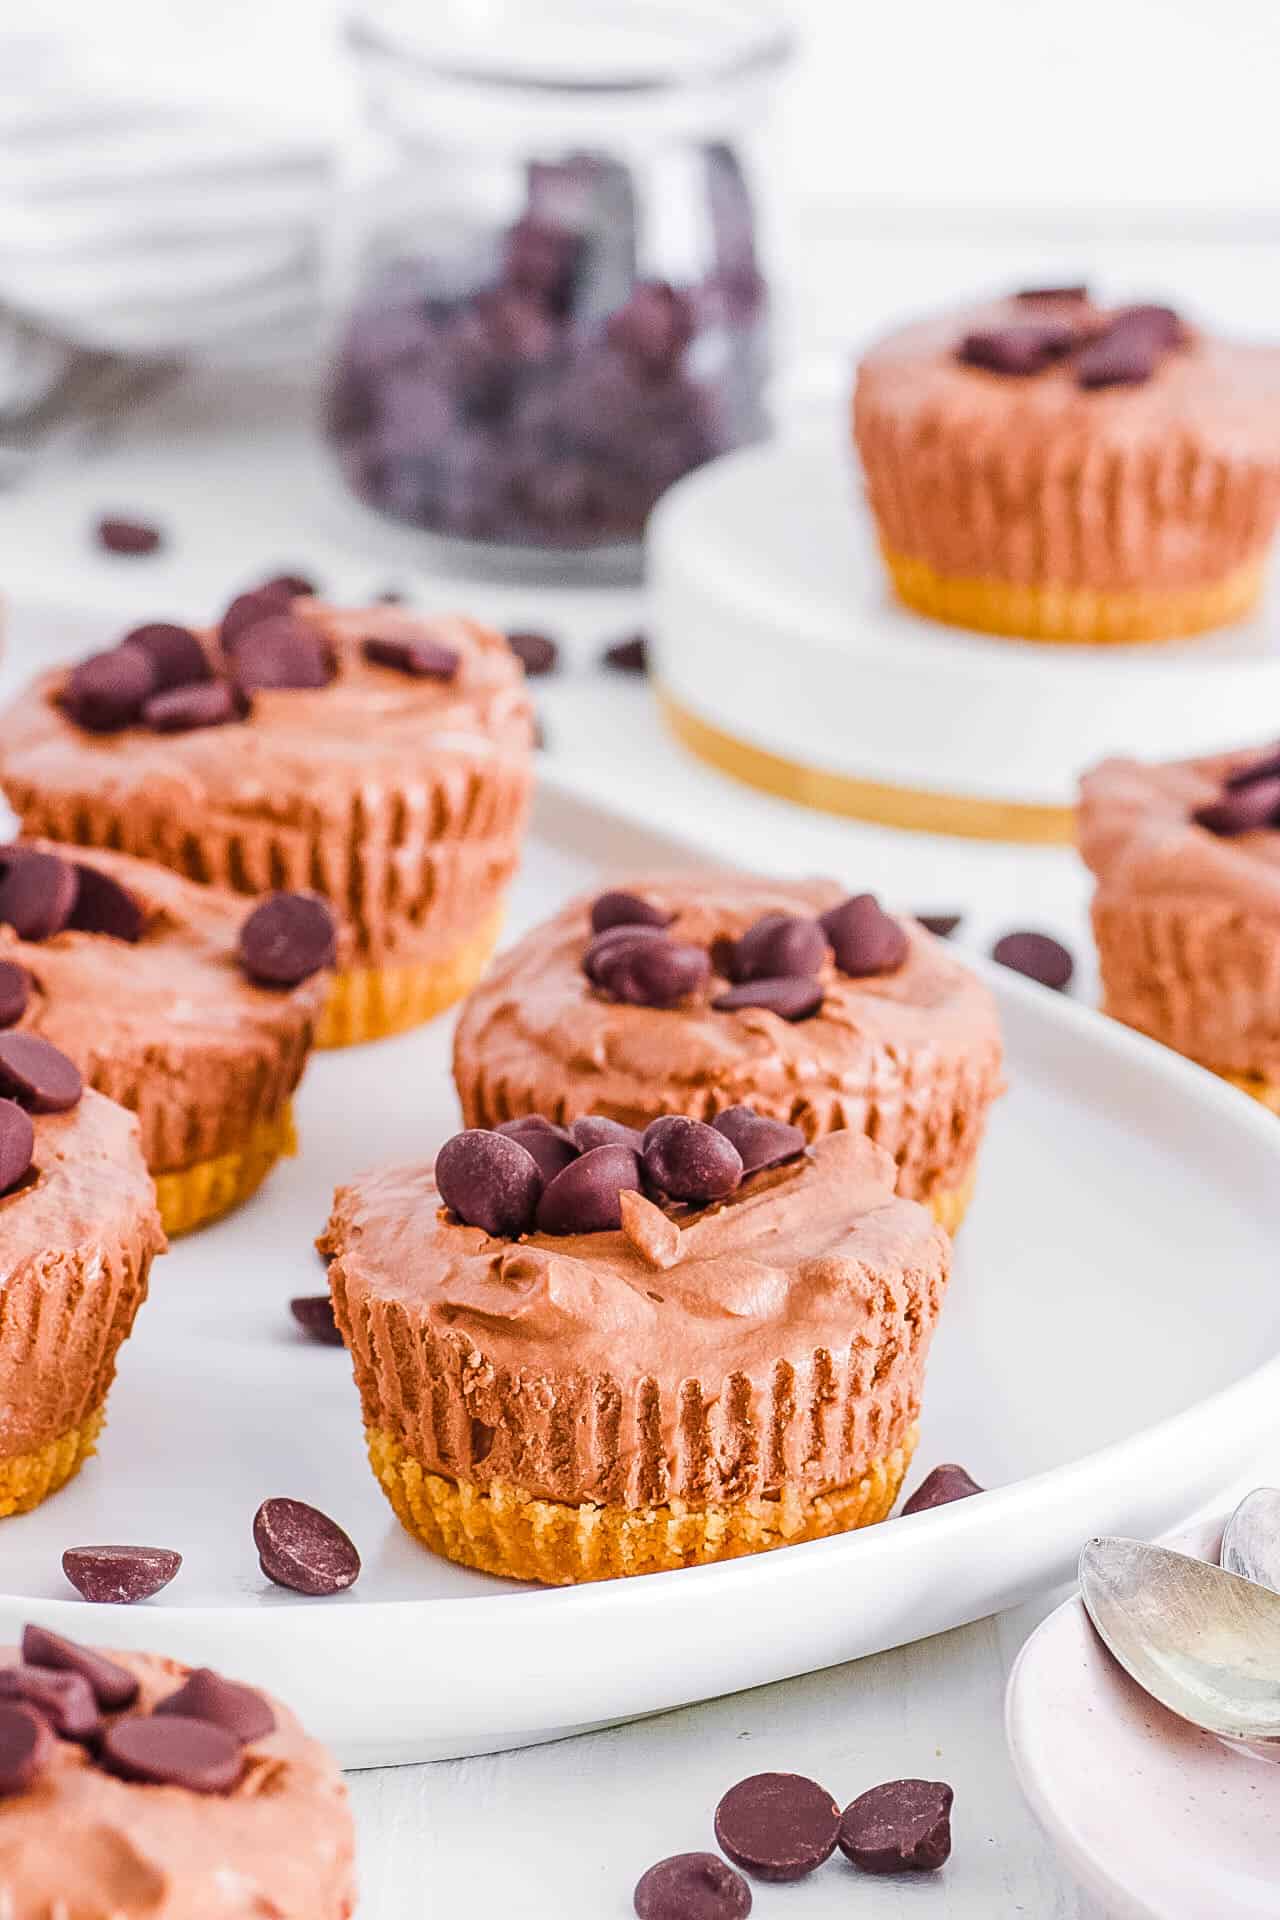
Nothing beats a sweetly satisfying dessert that requires no oven time, like my no-bake chocolate cheesecake. I use graham cracker crumbs, cream cheese, and dark chocolate for this creamy little delight. It comes together with a rich but light filling, and a buttery crust that sets perfectly in the fridge. This is one of the desserts I have on repeat during the hotter months.
This no-bake chocolate cheesecake is right up there with my no-bake salted caramel cheesecake when it comes to summertime entertaining. If you love the contrast and complementary flavors of sweet and salty, I highly recommend trying this one.
I created this recipe after spending years favoring baked cheesecakes. I believe they were superior. My passionfruit cheesecake was a summer staple in my family. Every summer, I would stand in my hot kitchen, sweating and promising myself that I would not make it again next summer. Fast forward a few summers, and the heat was intense. I had already promised my family cheesecake, but could not bear to turn on the oven. Instead, I decided to make these mini chocolate cheesecakes. And now they are the new summer staple. I owe refrigerated cheesecakes and an apology. Ha!
As a nutritionist, I appreciate the lightness of this chocolate cheesecake, compared to traditional baked versions. The whipped and folded ingredients keep the filling delicate, which I can enjoy without the sluggish feelings afterwards. The dark chocolate adds a richness filled with antioxidants, while portioning into mini cheesecakes ensures that servings are balanced. Best of all, there are no complicated baking steps required.
The reason this no-bake cheesecake works is thanks to the way the ingredients each play their part, but still work together to form a dessert of varying flavors and textures that is still cohesive. The crust sets firmly once the melted butter chills, and the filling thickens to a creamy finish as the chocolate cools and blends with the cream cheese. I beat the cream cheese until smooth to prevent lumps and incorporate air for a light texture. Chilling the cheesecakes for several hours allows everything to firm up and flavors to intensify.
Like me, my sister also leaned more towards baked cheesecake varieties. It is one of those desserts that is a true labor of love. She had planned to bake one for a friend’s birthday, and had all her ingredients ready when suddenly, the oven would not turn on. Panicked, she called me asking if I could help her out. I am sure she meant could I bake one for her, or make my oven available; unfortunately, I was not home. Instead, I calmed her down and talked her through the basic steps of this chocolate cheesecake and sent her the recipe. Instead of mini ones, she baked a standard-sized one, and she absolutely nailed it!
Latest Recipe Video!
🥘 Ingredients
I use simple, easy-to-find ingredients to build layers of flavor and texture in this chocolate cheesecake. Here is what I use:
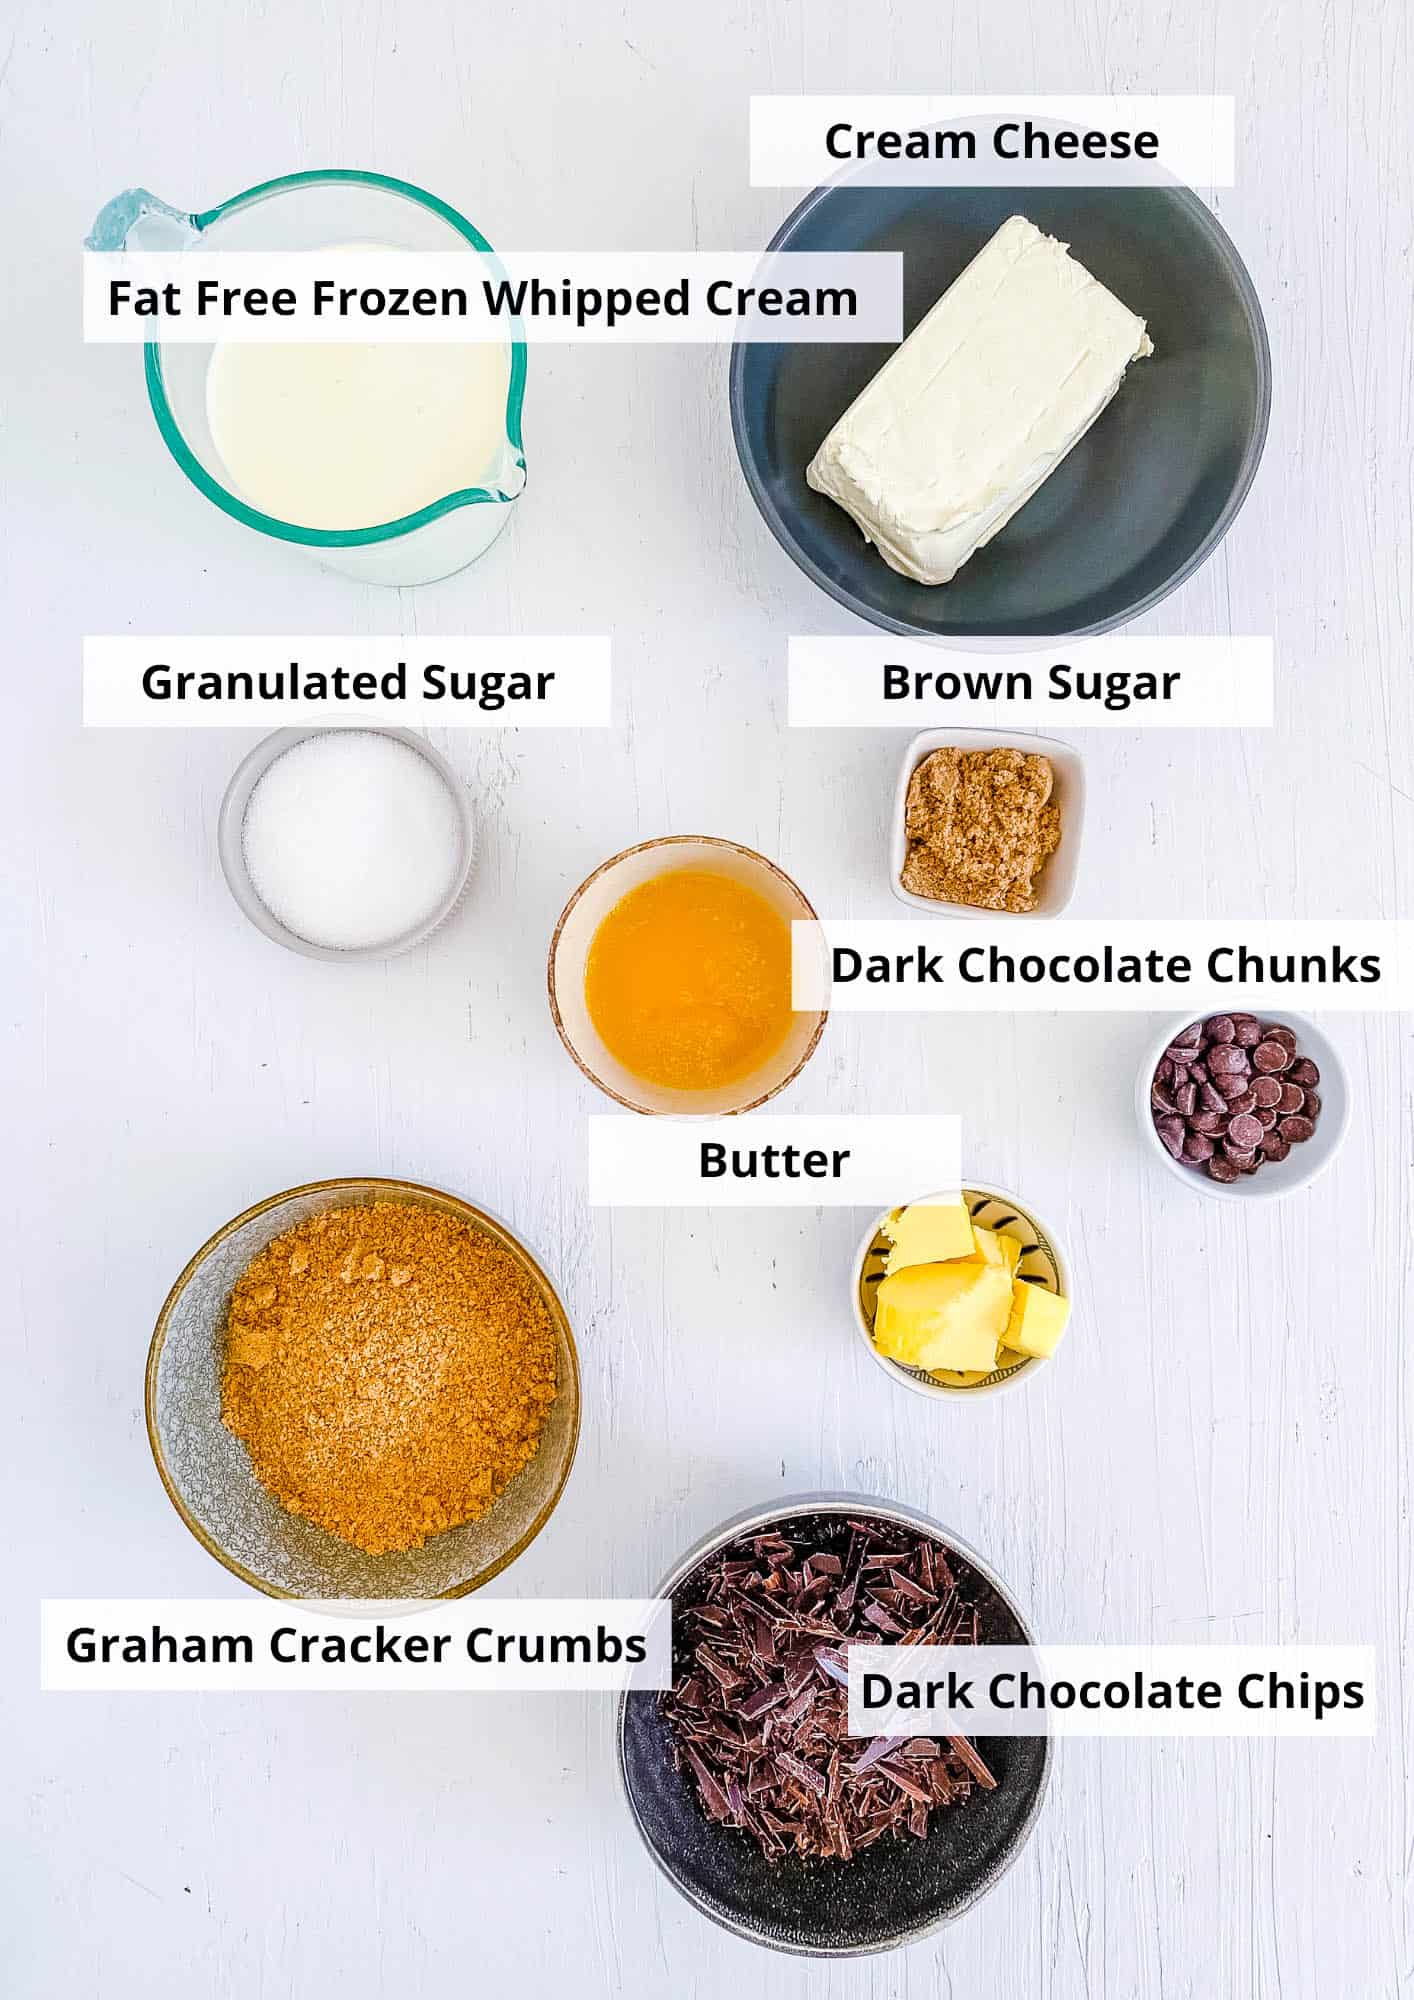
Graham cracker crumbs: I use this to create a sturdy base. You can use store-bought graham crackers, but I like using my homemade vegan graham crackers.
Unsalted butter: Melted butter binds my graham cracker crumbs, while the softened butter is incorporated into the filling for richness.
Brown sugar: I stir this into my crust mixture for sweetness and a subtle caramel flavor.
Dark chocolate chunks: I melt high-quality dark chocolate chunks for a full-bodied flavor.
Chocolate chips: These are sprinkled on top for added texture and an extra bit of chocolatey goodness.
Cream cheese: I beat full-fat cream cheese for that classic cheesecake filling.
Sugar: I use white sugar to sweeten the filling without overpowering the chocolate. For a healthier alternative, I also use coconut sugar.
Fat-free frozen whipped cream: This is thawed and folded into my filling to create a light and airy texture that sets without baking.
🔪 How To Make
I prepare this chocolate cheesecake in simple layers, and then let the refrigerator do the rest of the work. Here is how I make it:
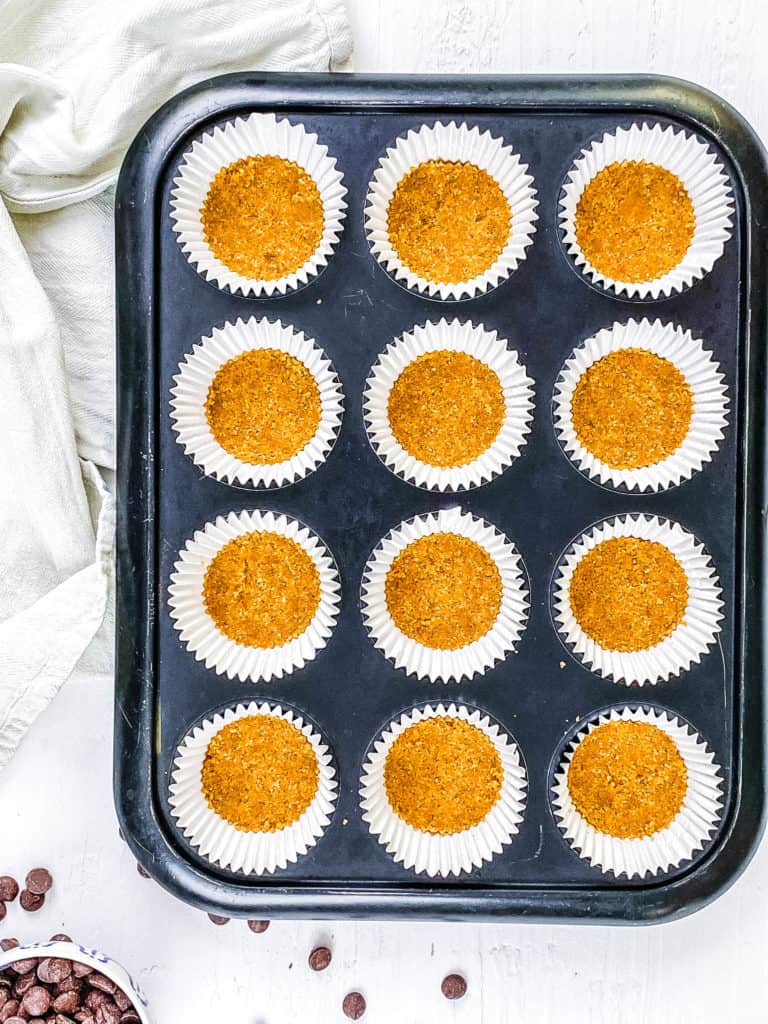
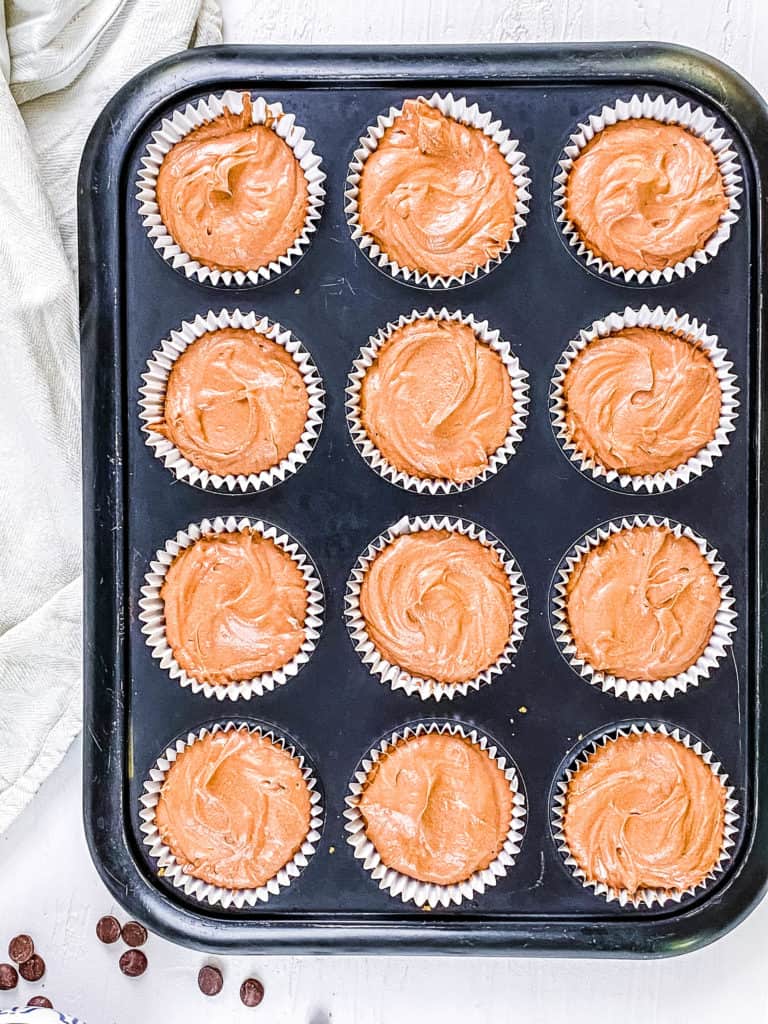
Line muffin tin: I place cupcake liners into a muffin tin and gently spray them with non-stick cooking oil.
Make the crust: Next, I mix the graham cracker crumbs, brown sugar, and melted butter.
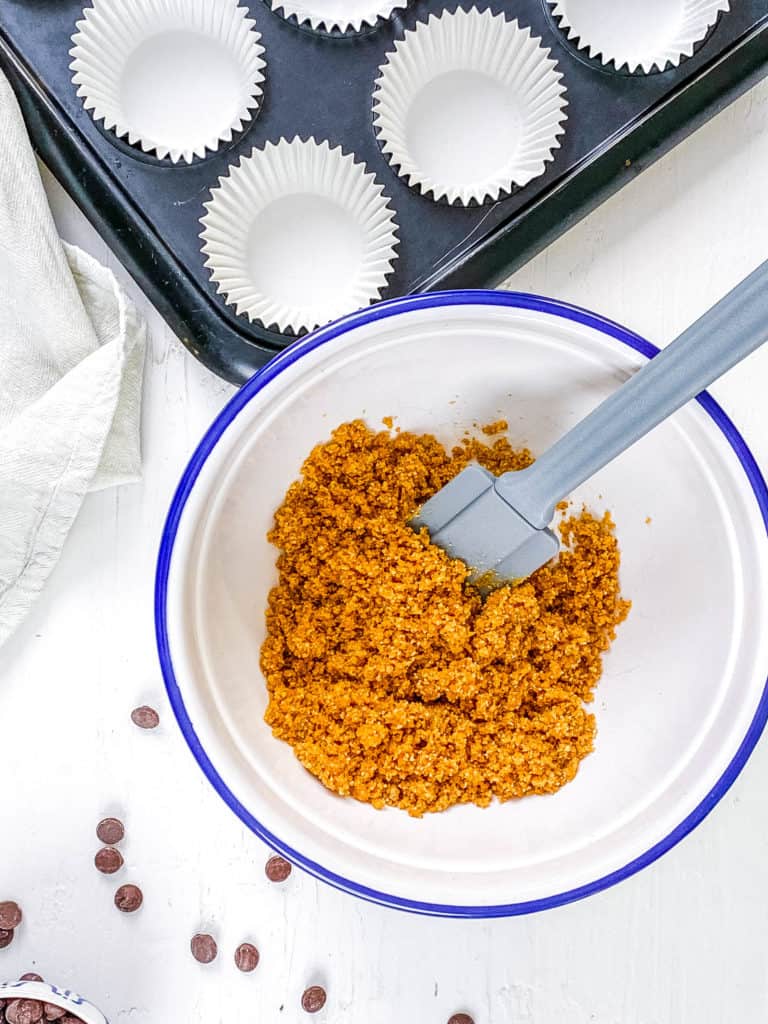
Pack into the liners: Then I pack about 2 tablespoons of the crust mixture into the bottom of the cupcake liners.
Melt chocolate: I like to melt the chocolate in the microwave by placing the chopped chocolate in a microwave-safe bowl and melting it at 15-second increments.
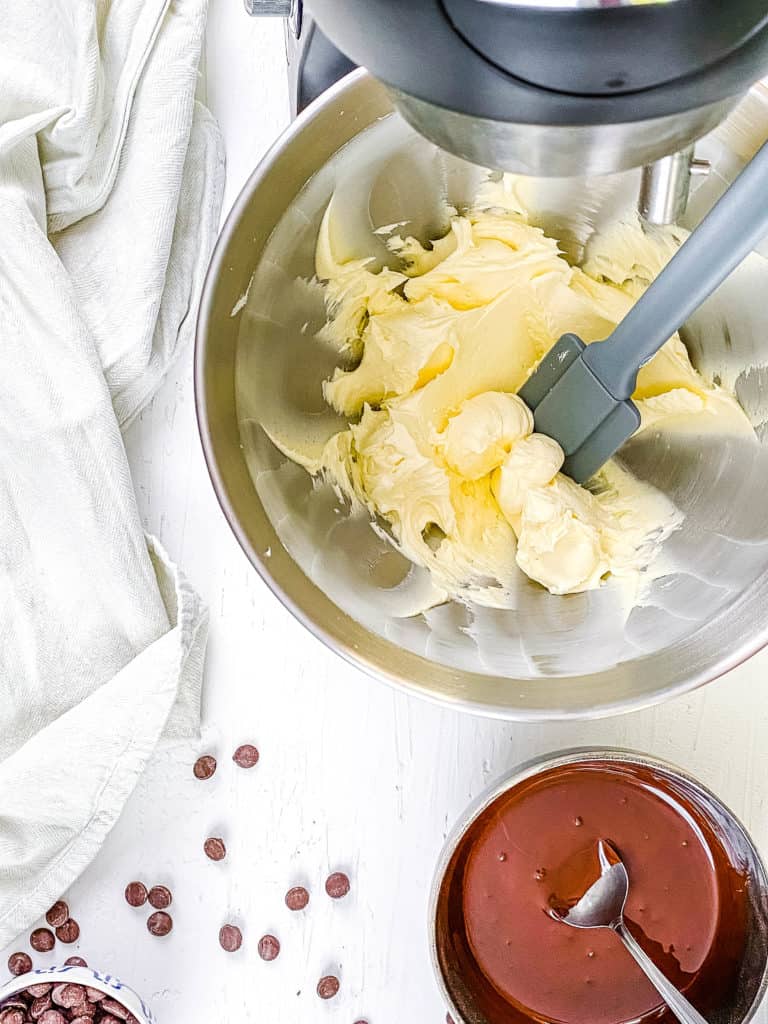
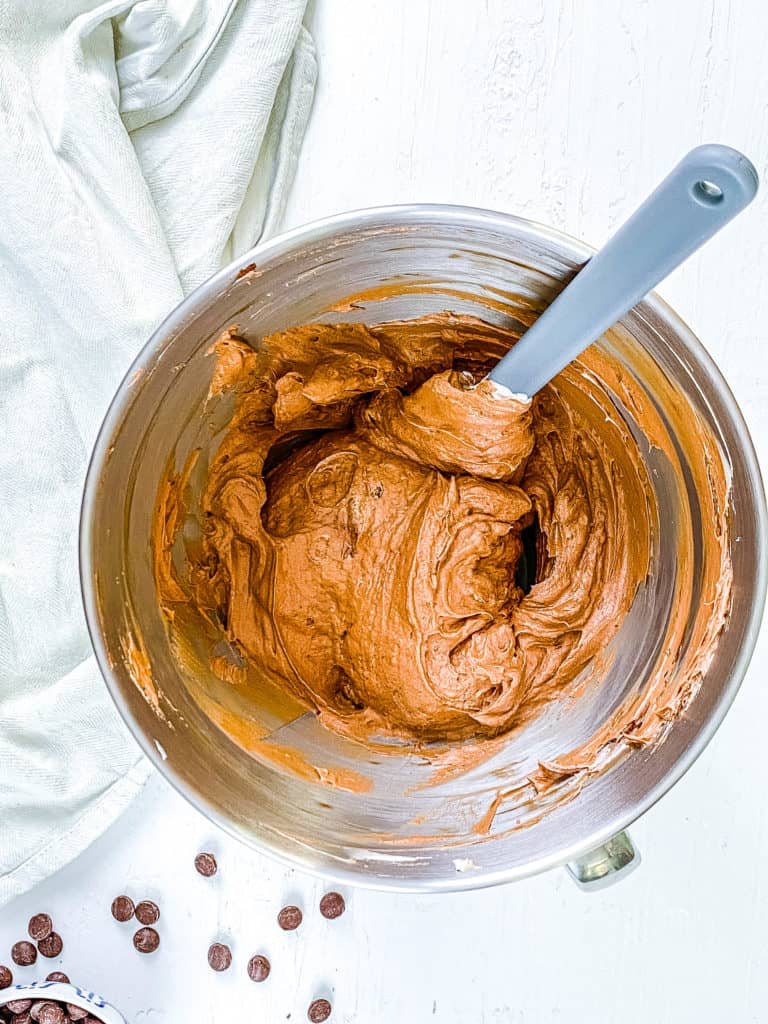
Make the filling: In a separate bowl, or the bowl of a stand mixer, I use the paddle attachment to beat my cream cheese, sugar, and softened butter on high speed. Then I slowly add in the melted chocolate, and mix on medium. Once the chocolate is fully incorporated, I gently fold in the whipped topping.
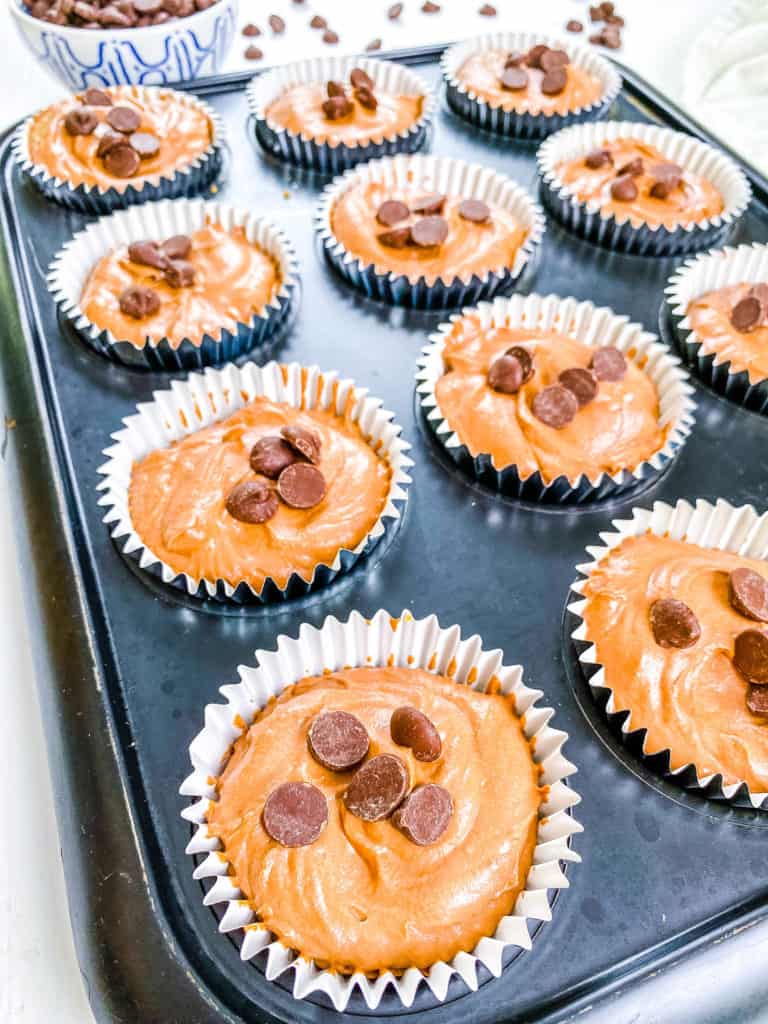
Fill the liners: Next, I scoop about 4 tablespoons of the rich chocolate filling on top of each graham cracker base and spread until level. Then I sprinkle the top with chocolate chips.
Refrigerate: Finally, I refrigerate for 4 hours until fully set.
My #1 Secret Tip for this chocolate cheesecake recipe is to start with fully softened cream cheese. If I rush and use the cream cheese while it is still cold and firm, I end up with lumps that never smooth out. By allowing it to soften at room temperature, I achieve that silky finish.
Other Tips To Keep In Mind:
- Use a double boiler: If you are worried about scalding your chocolate in the microwave, place it in a heat-proof bowl over a pot of boiling water and allow it to melt, while stirring occasionally. I make sure the water never touches the bottom of the bowl.
- Chill the crust: I place the crust-lined cupcake papers in the freezer while I prepare the filling. This helps firm them up faster.
- Press the crust: After filling the cupcake liners with my crumb mixture, I like to press it down firmly for a solid base.
- Chill longer: I like making these cheesecakes the night before I need them, so they have ample time to set.
📖 Variations
This chocolate cheesecake is easy to customize and accessorize. These are some of the variations I have tried:
Peanut butter cheesecake: I add 1/2 cup of creamy peanut butter to the filling for a chocolate peanut butter flavor that my kids love. And instead of garnishing with chocolate chips, I use shards of my vegan peanut brittle.
Bailey’s boozy boost: If I am making these cheesecakes for grown-ups only, I like adding 2 tablespoons of Baileys cream liquor in place of the chocolate. Depending on the company, I have been known to add a bit more to make them stronger. Ha!
White chocolate cheesecake: I replace the dark chocolate chunks with 3/4 cup of white chocolate and garnish with fresh raspberries and grated white chocolate for an elegant finish. This is my personal favorite.
🍽 Serving Suggestions
Whenever I make these no-bake chocolate cheesecakes for a family gathering, I always make sure to make my salted caramel cheesecake as well. I know a lot of people enjoy a large cliche rather than a mini version. The last time I made it, I decided to garnish it a bit differently, since it was served at a birthday party. I scattered bits of my vegan caramel popcorn on the surface and drizzled some of my healthy vegan chocolate sauce. Next time you have a birthday to celebrate, make this cake and place a dazzling candle or sparkler in the center.
A few years ago, when my kids were still quite young, I had a huge cheesecake order for a birthday. I made these mini chocolate cheesecakes, strawberry cheesecake cookies, and another big batch of my healthy cheesecake bites. Every surface of my kitchen was filled with cheesecake. The next week, my youngest kid’s teacher told me that during a writing assignment, my kid had claimed that I work at the Cheesecake Factory. Ha! I mean, technically, on that day, they were not wrong.
🧊 Storing And ♨️ Reheating
Refrigeration: I store the cheesecakes in an airtight container in the refrigerator for up to 5 days. I keep them chilled until just before serving to keep them firm.
Freezing: I wrap each cheesecake tightly with plastic wrap and then foil. These freeze for up to 2 months.
Reheating: This is a chilled dessert and does not require reheating. However, if they are frozen, I make sure to thaw them in the refrigerator overnight.
❓ Recipe FAQs
If my cheesecake does not firm up, it is either due to insufficient chilling time or too much moisture in the filling. I make sure that the frozen whipped cream is not overly thawed or melted, and that the chocolate is slightly cooled before adding to avoid this. And always make sure to give your cheesecakes at least 4 hours to chill.
I like using high-quality dark chocolate bars instead of chocolate chips for my filling. Chocolate chips contain stabilizers that retain their shape, which affects their smoothness when melted. I like to chop my chocolate bar up as fine as possible for a silkier texture.
If my crust crumbles, it is due to insufficient chilling before I added the filling, or because I forgot to press it into the liners. If the crust is crumbling after refrigeration, I keep them inside the liners and serve them in ramekins with little spoons.


Love this dessert recipe? Please leave a 5-star rating 🌟 in the recipe below and/or a review in the comment section further down the page!
You can also FOLLOW ME on FACEBOOK, INSTAGRAM, and PINTEREST to see more delicious, healthy, family-friendly food, and if you have any questions, I’m here to help!
📋 Recipe Card
No Bake Chocolate Cheesecake
Nothing beats a sweetly satisfying dessert that requires no oven time, like my no-bake chocolate cheesecake. I use graham cracker crumbs, cream cheese, and dark chocolate for this creamy little delight. It comes together with a rich but light filling, and a buttery crust that sets perfectly in the fridge. This is one of the desserts I have on repeat during the hotter months.
Servings: 12 mini cheesecakes
Calories: 262.8kcal
For the Graham Cracker Crust
For the Chocolate Cheesecake Filling:
- My #1 Secret Tip for this chocolate cheesecake recipe is to start with fully softened cream cheese. If I rush and use the cream cheese while it is still cold and firm, I end up with lumps that never smooth out. By allowing it to soften at room temperature, I achieve that silky finish.
- Use a double boiler: If you are worried about scalding your chocolate in the microwave, place it in a heat-proof bowl over a pot of boiling water and allow it to melt, while stirring occasionally. I make sure the water never touches the bottom of the bowl.
- Chill the crust: I place the crust-lined cupcake papers in the freezer while I prepare the filling. This helps firm them up faster.
- Press the crust: After filling the cupcake liners with my crumb mixture, I like to press it down firmly for a solid base.
- Chill longer: I like making these cheesecakes the night before I need them, so they have ample time to set.
Serving: 1cheesecake | Calories: 262.8kcal | Carbohydrates: 23g | Protein: 2.8g | Fat: 19.9g | Saturated Fat: 11.5g | Cholesterol: 41.3mg | Sodium: 158mg | Potassium: 36.3mg | Fiber: 1.8g | Sugar: 12.4g