
This post may contain affiliate links. As an Amazon Associate, I earn from qualifying purchases. Please read my disclosure.
Just give me 3 staple ingredients and 30 minutes, and voila, I have my vegan arepas! Crispy on the outside and fluffy on the inside, they are beyond simple and yet unbelievably delicious. I have made these as a snack, for breakfast, lunch, dinner, and even dessert.

I created my vegan arepas after learning how many traditional Colombian arepas are cooked in butter or lard. Although these days they are being made with a more mindful approach, I decided to put my own spin on it. If you enjoy guilt-free savory baked dishes, like this one, you should try my healthy low-calorie biscuits on your next baking day.
On those nights I was alone at home, cooking for one, I became part of the “girl dinner tribe”. Naturally, my girl dinners had to be vegan, but still satisfying in a uniquely unorthodox way. There was one night when my planned girl dinner was my vegan Sloppy Joes, but there was not a single vegan dinner roll in sight. No problem. I made a batch of my vegan arepas and filled them with my crockpot lentil filling. Honestly, I preferred my Sloppy Joes this way. Ha! You must try it.
This vegan arepa recipe takes 3 humble ingredients and turns them into a deeply satisfying baked good that tastes like it was made with immense effort. Cornmeal provides complex carbohydrates for steady energy, and when paired with fiber-rich fillings, it becomes a balanced meal, which appeals to me as both a mom and health coach. I love that it is not as dense as sandwich bread, and also not overly processed, making it ideal for those looking for a naturally gluten-free option that still feels substantial.
The texture works thanks to proper hydration and cooking technique. I allow the dough to rest, which gives the cornmeal time to absorb the water fully, resulting in a tender interior. Cooking it in a pan gives it that crisp golden crust that I look for. Finishing them in the oven ensures they cook through, without becoming stodgy or dry.
In our house, we love having a build-your-own-burger night for a weekend dinner. It has become like a sort of dinner theater. Everyone has their burger buns and a selection of toppings, as well as access to anything ready to be used in the fridge or pantry. These burgers get names and back stories, and at times, it even gets competitive. Recently, I decided to throw a spanner in the works and have a fill-your-own arepas dinner instead. I knew my kids would love it, but I never expected my husband to be the most excited one at the table. Ha! If you are looking for a way to get your kids excited and enthusiastic about healthy meals, try a DIY style dinner with arepas.
Latest Recipe Video!
🥘 Ingredients
I use just 3 simple ingredients, excluding water, to make these crisp, fluffy rounds.
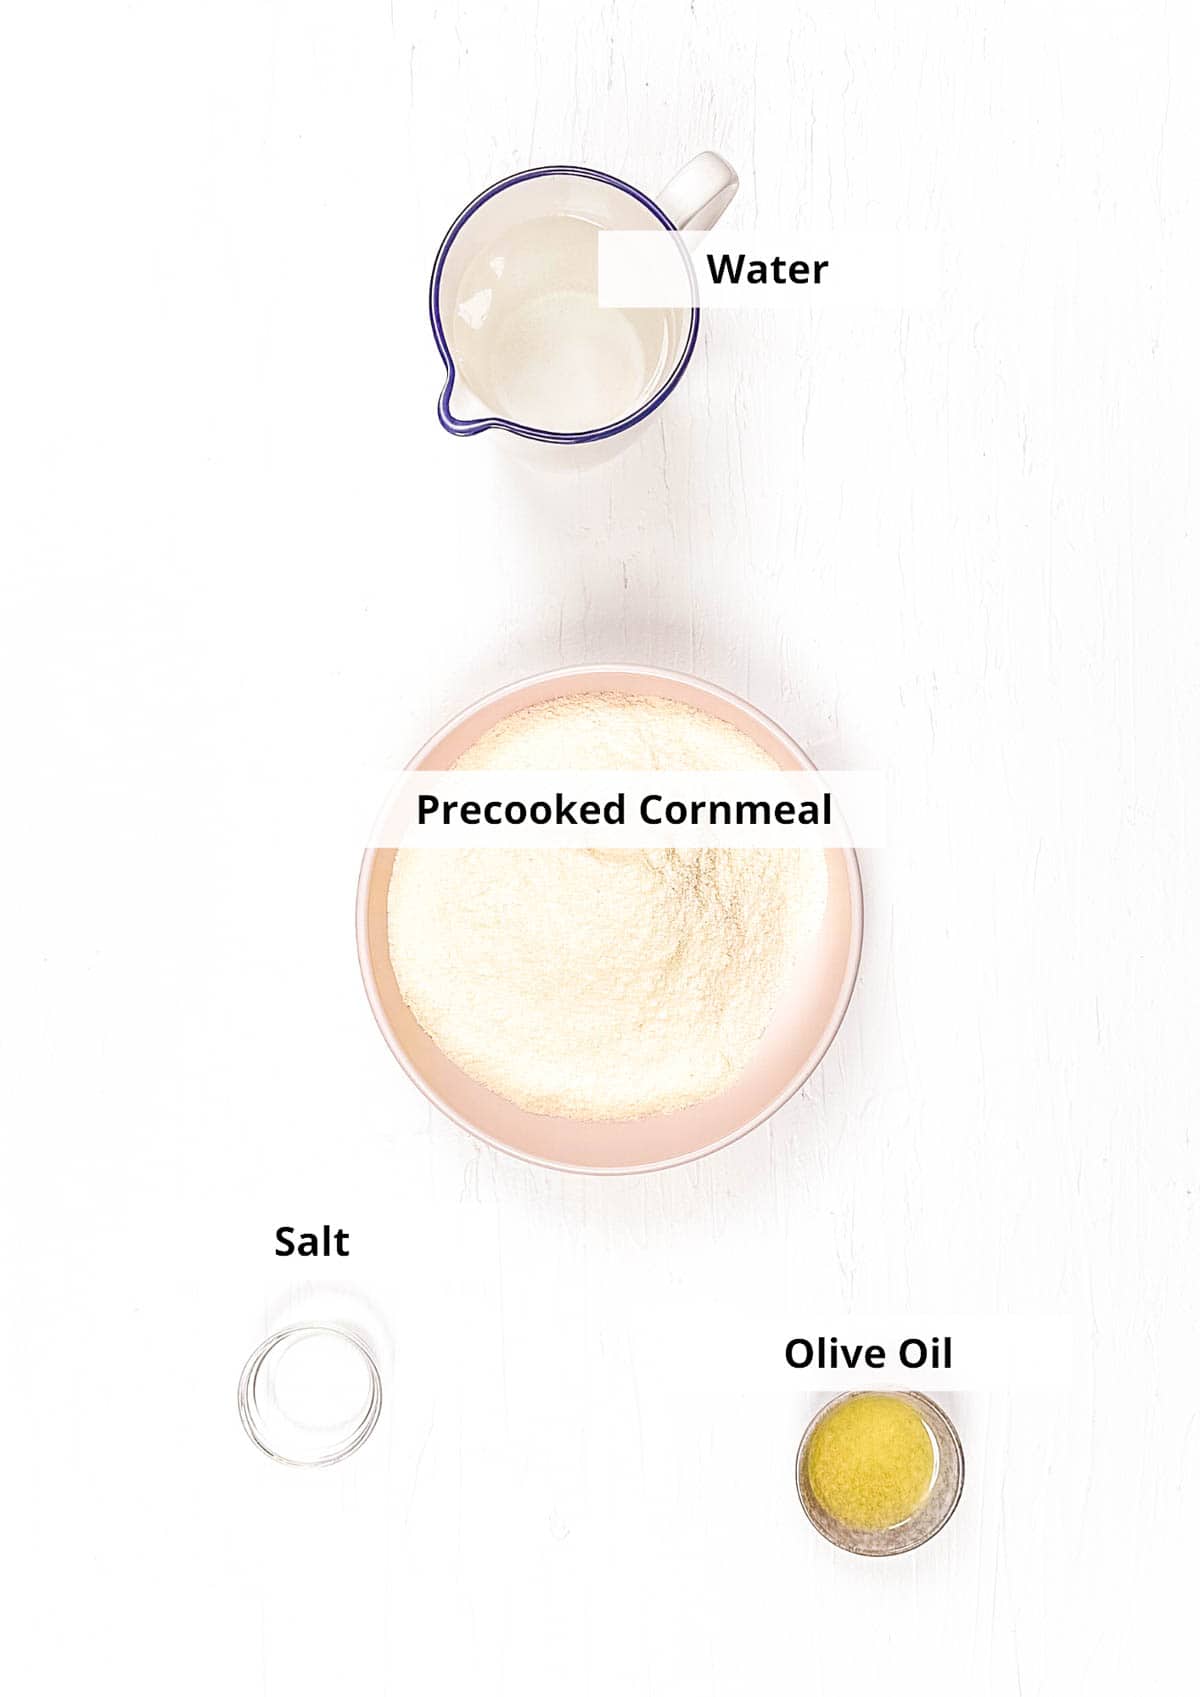
Masarepa: This is pre-cooked corn-meal which I use as the key ingredient in this dish.
Salt: I use salt to enhance the mild corn flavor.
Warm water: This helps hydrate my flour and form a soft dough.
Oil: I use this for frying and achieving the crispy exterior. I like using olive, avocado, coconut, or vegetable oil.
🔪 How To Make
This recipe is so easy, and is a great one for those who are just starting with baking. Even my kids make them. Here is how to do it:
Preheat oven, combine dry ingredients: First, I preheat my oven to 350F. Then, in a large bowl, I combine my masarepa and salt.

Add water: Next, I slowly pour in warm water while stirring continuously.
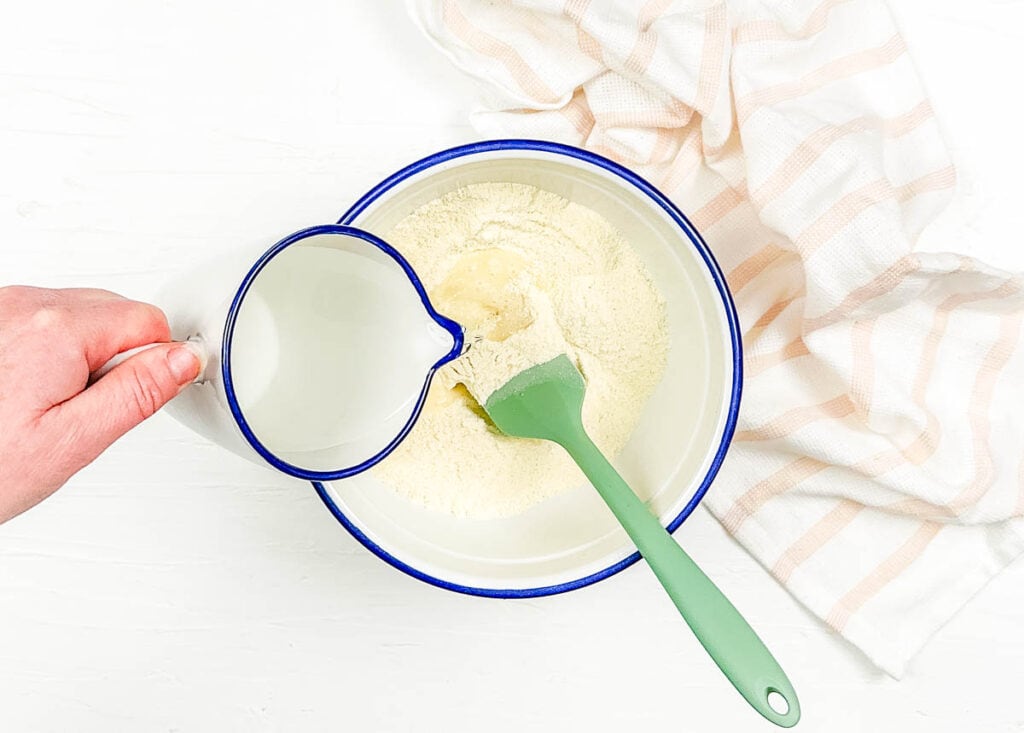
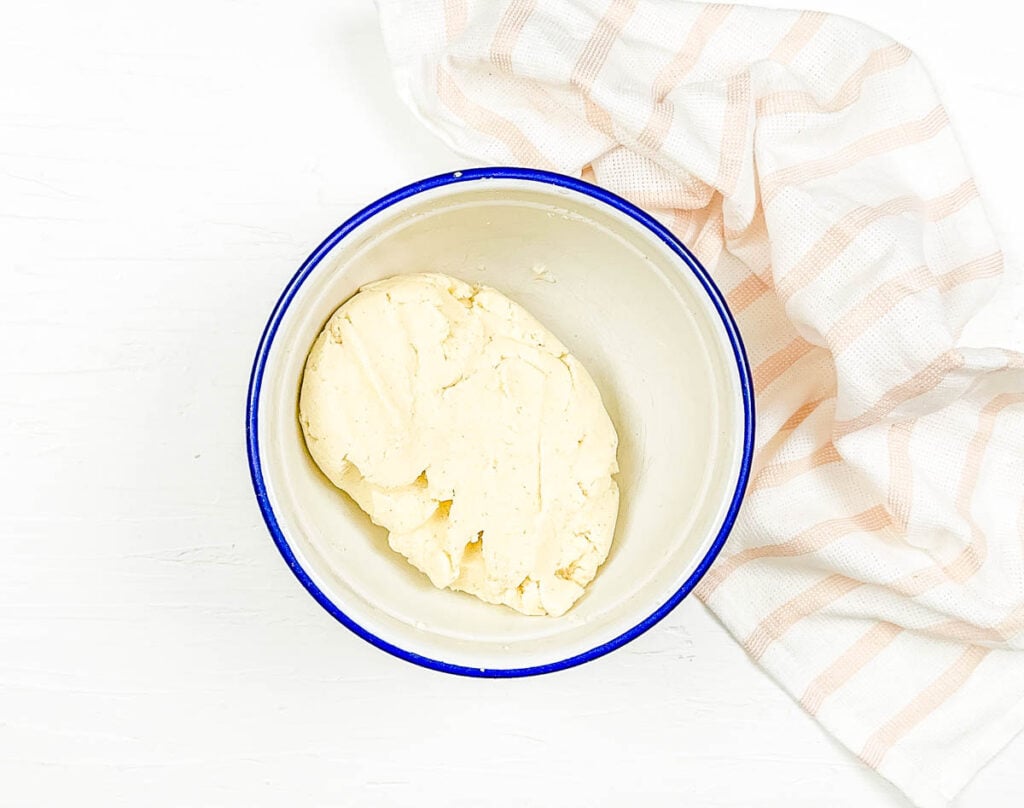
Knead, then rest: Once combined, I knead the dough for 3-4 minutes until smooth. I allow it to rest for 15 minutes, allowing the flour to fully absorb the water.
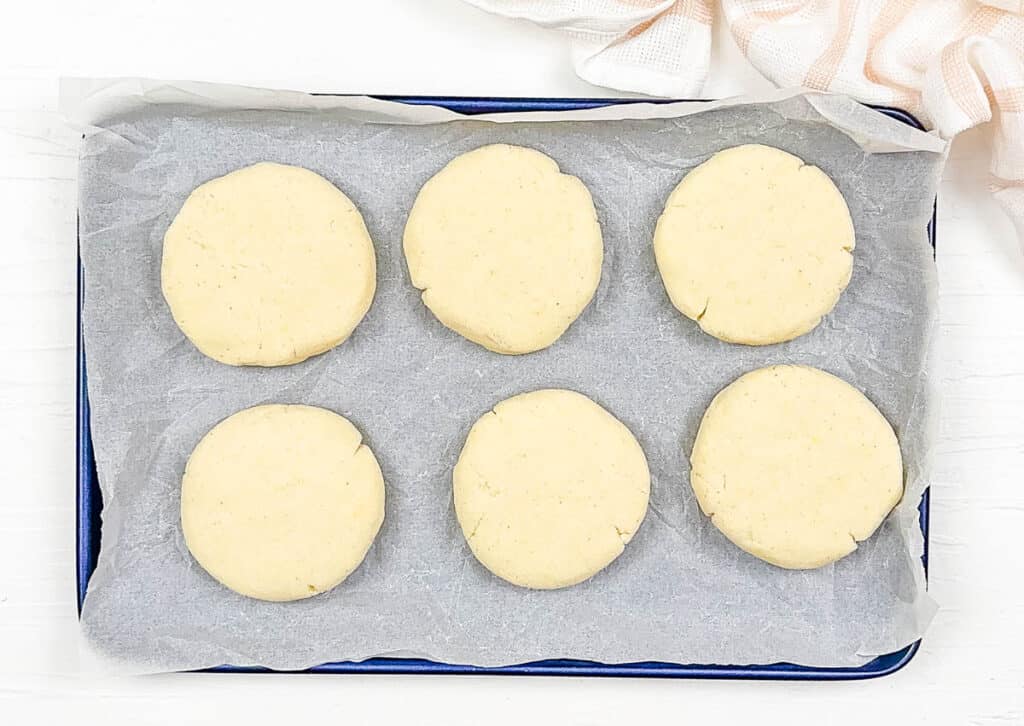
Divide dough: Next, I divide the dough into 6-8 equal portions.

Form discs: I roll each portion into a ball, then gently press it into a thick disc about ½ inch thick.
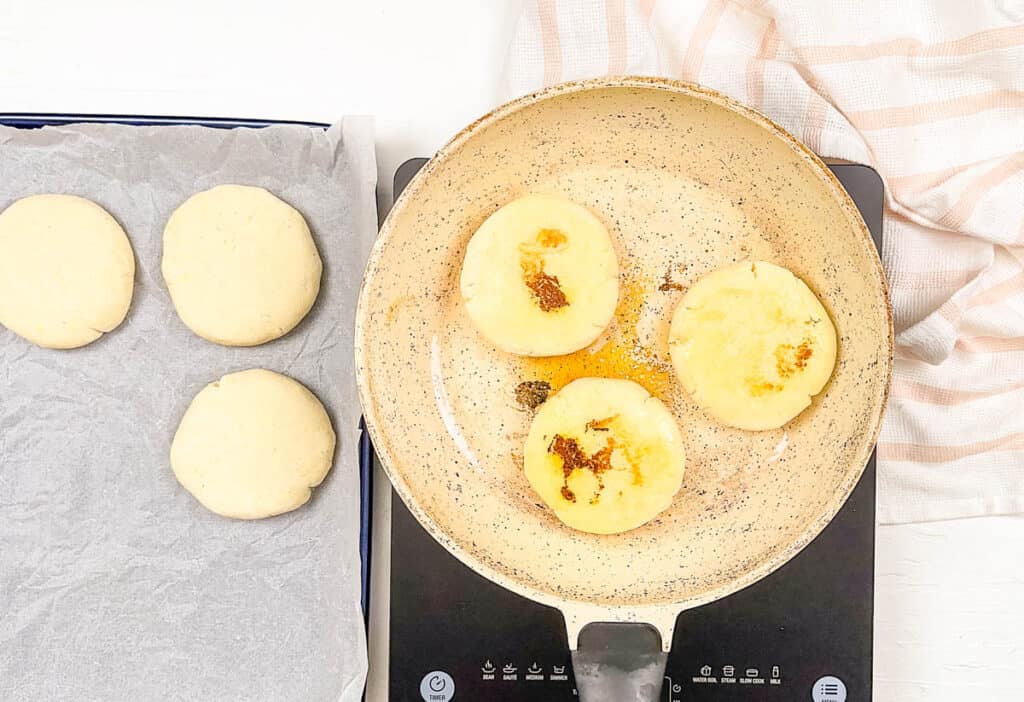
Cook Arepas: Then I heat oil in a skillet, over medium heat, and cook for 2-3 minutes per side until crisp and lightly golden.
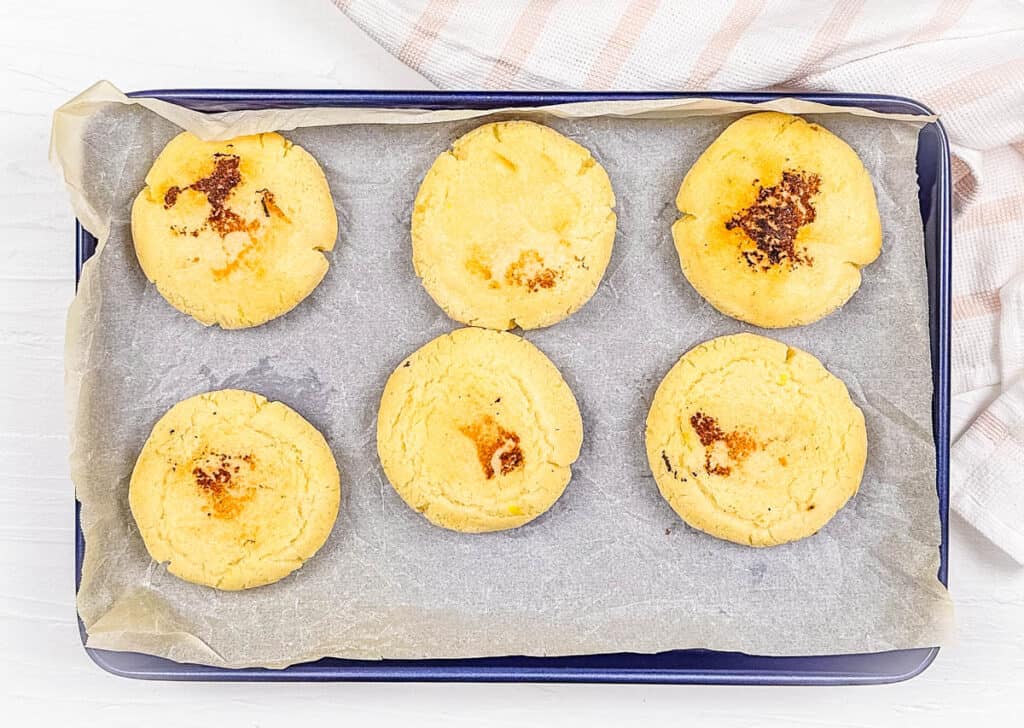
Bake: Finally, I transfer to a lined baking sheet and bake for 15-20 minutes until cooked through and fluffy inside.
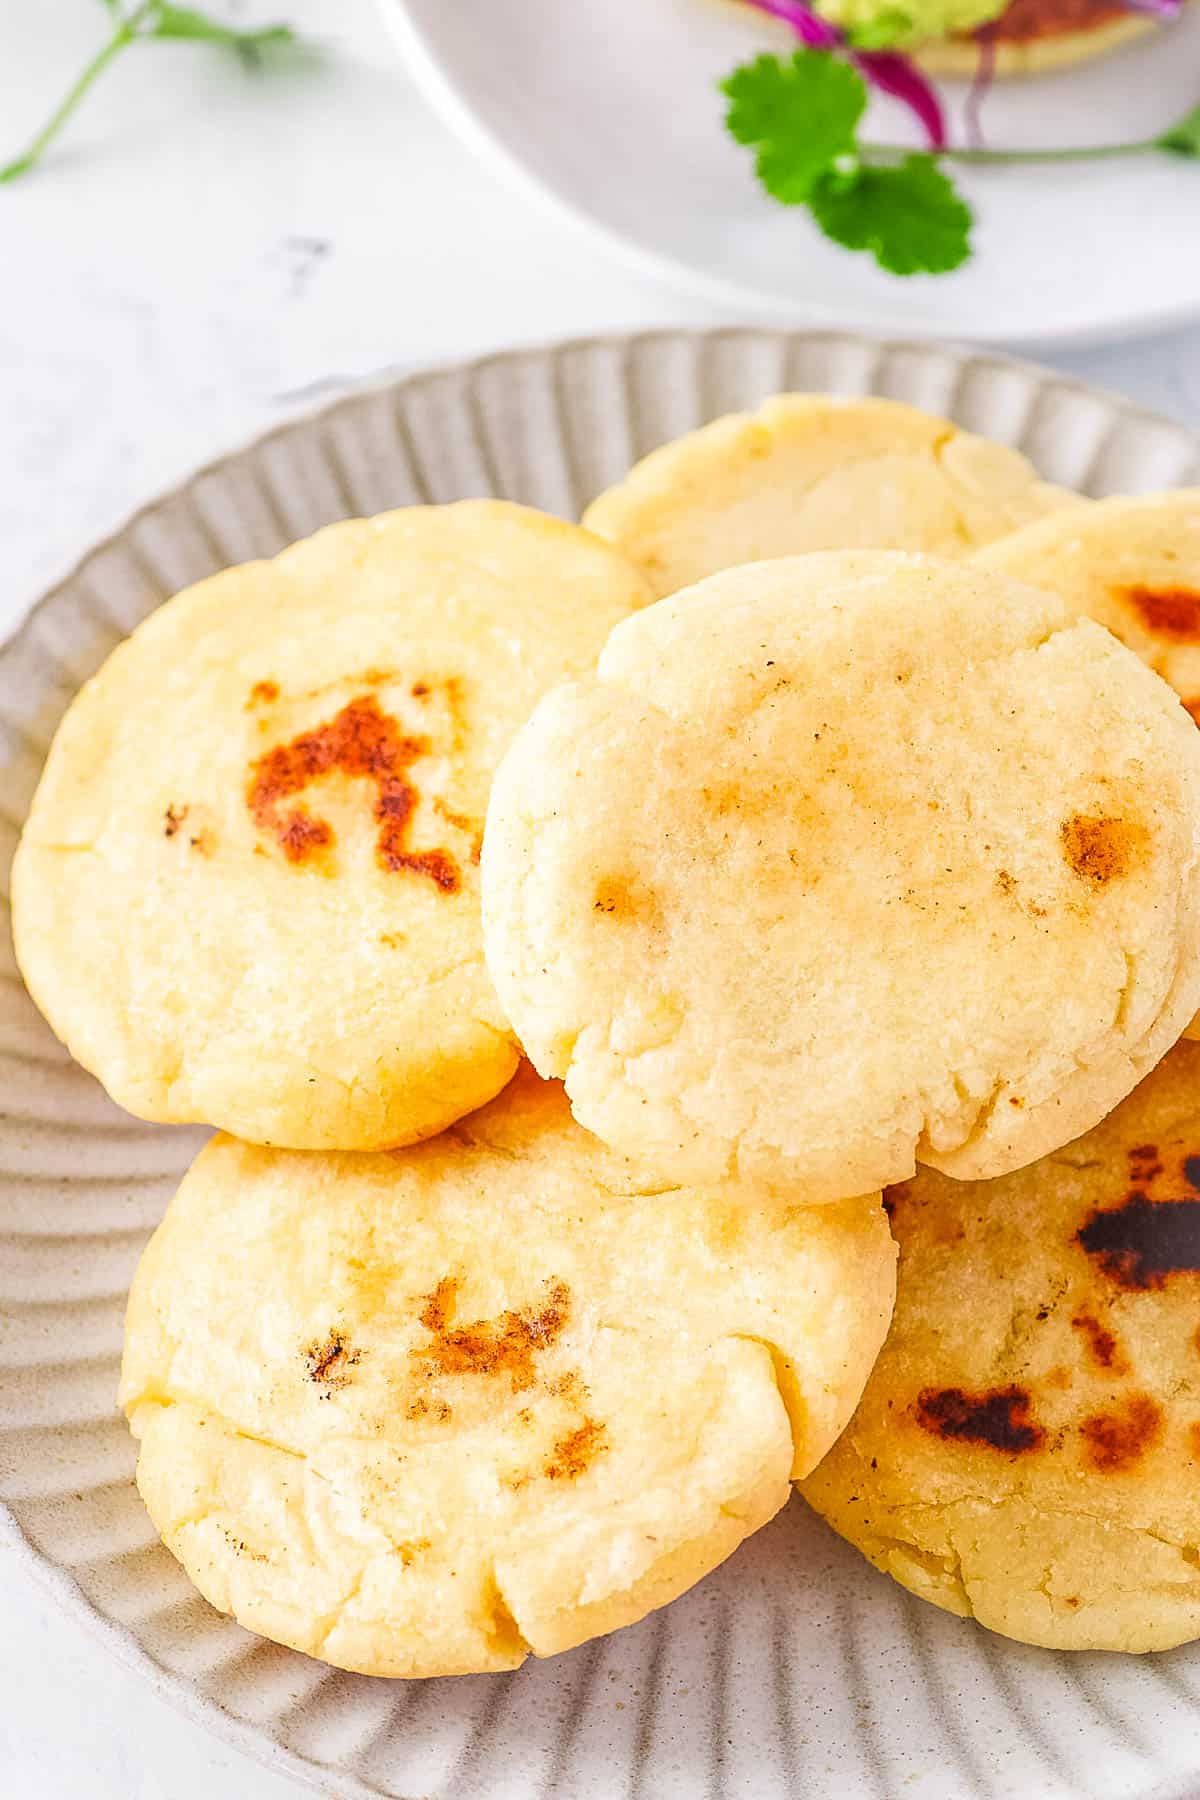
Cool, and serve: I allow my arepas to cool slightly before slicing open and filling.
My #1 Secret Tip for this vegan arepas recipe is to give the dough a proper chance to rest. I let it rest for the full 15 minutes. This is how I make sure that I have a lighter, fluffier end result, instead of a dense one.
Other Tips To Keep In Mind:
- Smooth cracked edges: If the edges of my dough crack when I press them out, I make sure to smooth them out with dampened fingers. This allows for a seamless result.
- Do not make discs too thin: If they are too thin, they may not be able to be sliced open and filled.
- Cast iron for frying: I get the best results when I fry my arepas in a cast-iron skillet. It creates the crispiest crust and most even browning.
📖 Variations
This dough is meant to be somewhat neutral to allow for a variety of billings, but I also like to switch it up when I have a more focused filling in mind.
Garlic arepas: I add 1/2 teaspoon of garlic powder to my dry ingredients. This gives it a subtle savory flavor. My kids love the plain garlic arepas for dipping in their tomato soup.
Cinnamon surprise: If I use my arepas for a sweet filling, I like adding a pinch of cinnamon to my ingredients. It is so subtle but elevates the flavor entirely. My husband loves anything cinnamon, and this one is his favorite.
Herby arepas: I stir in a small amount of dried herb for an earthy, savory taste. I have experimented with many kinds, but so far my favorite has been freeze-dried sweet basil, whichIi use with my Italian fillings.
🍽 Serving Suggestions
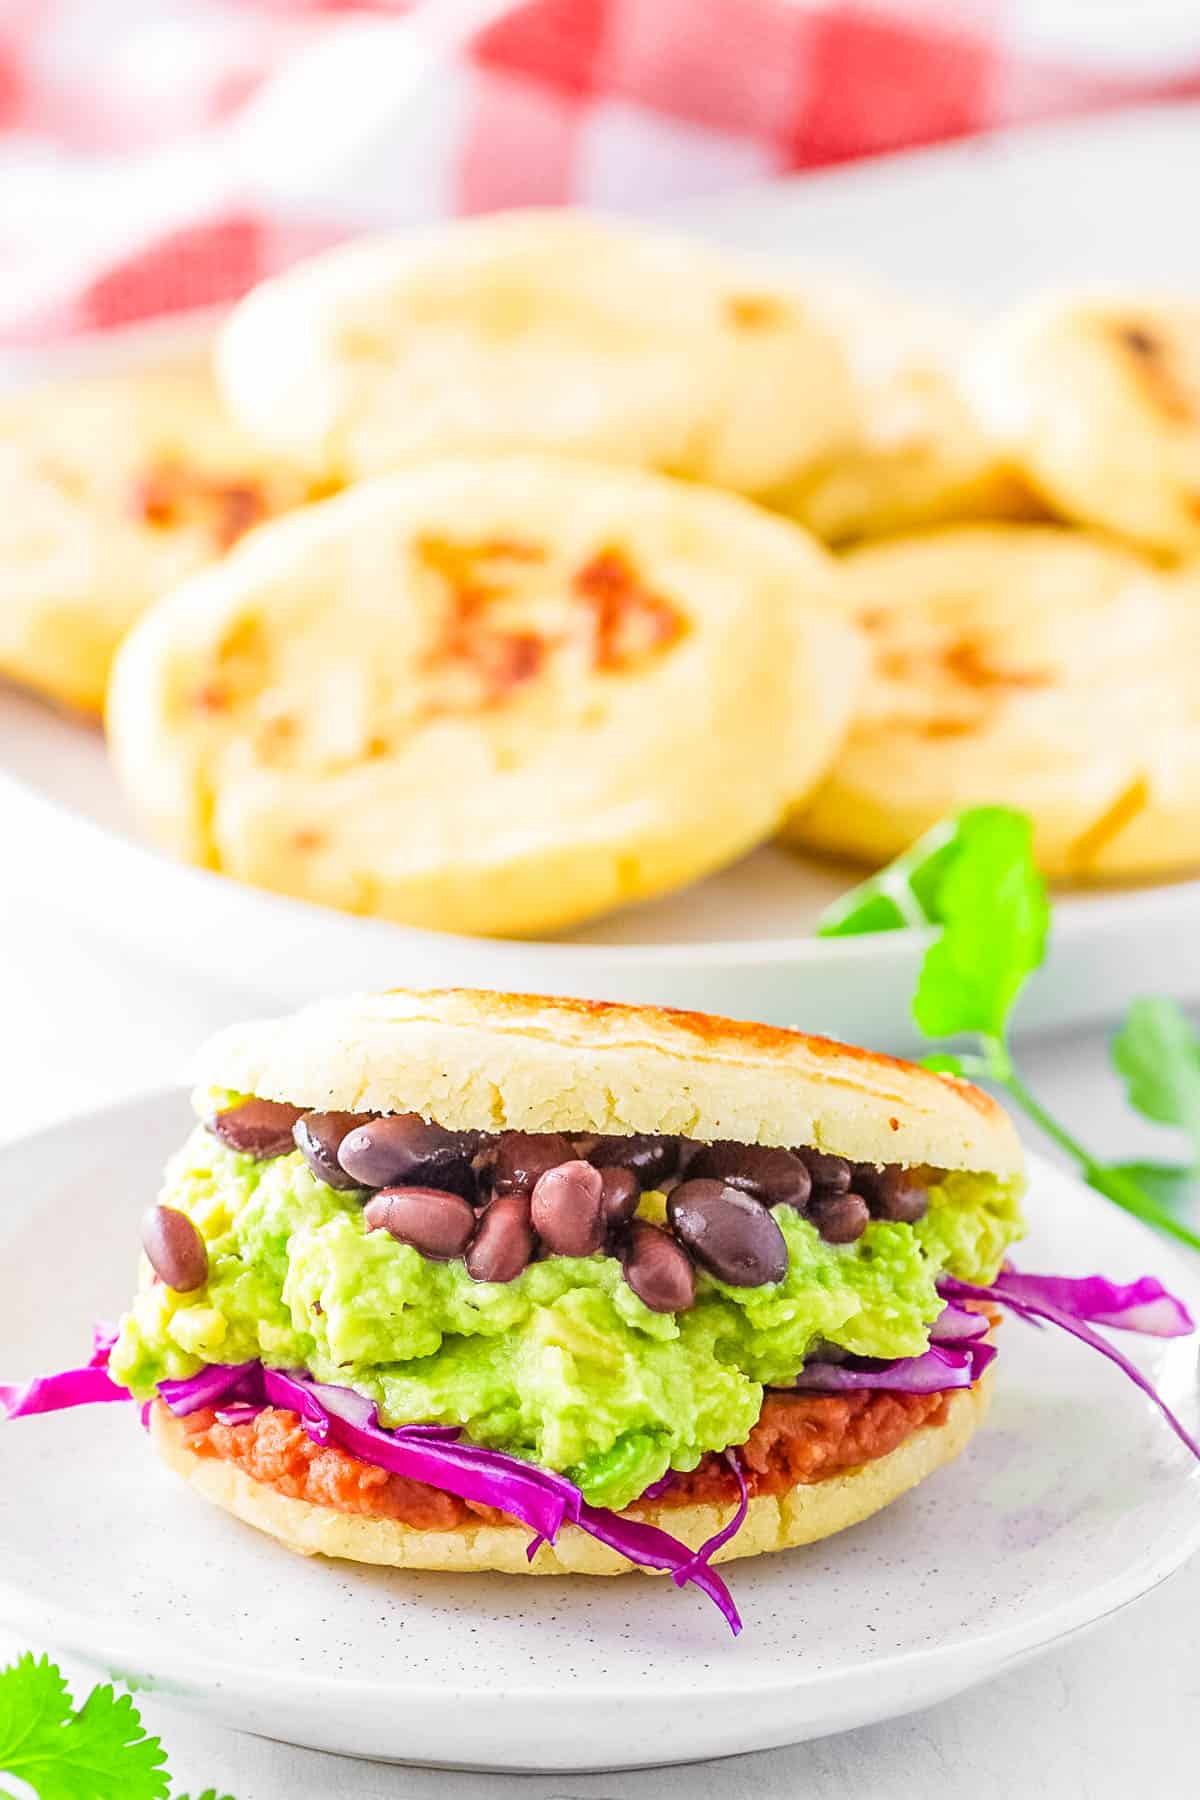
The fillings for these vegan arepas are infinite! In fact, I would be impressed if I found a filling that did not work. For a light, savory meal, I like filling them with a spread of my easy Greek hummus and a good helping of keto Greek salad. Can you see the theme here, right? Ha! This is a great filling, which I have made for lunchboxes and as light meals. I recommend trying this version, and let me know which other combination of fillings is your favorite.
Remember, I said these work as a dessert too? Yes, you heard me correctly. I stumbled into the sweet fillings by mistake. I had a few leftover arepas and decided to dress one up the same way I would dress a biscuit. I filled it with some of my homemade strawberry chia seed jam and used a piping bag to add in some of my vegan whipped cream. All I can say is WOW! And I regret not trying it sooner. It is also great with my vegan Nutella. Try it the next time you have a craving for something sweet and savory.
🧊 Storing And ♨️ Reheating
Refrigeration: I store cooled arepas in an airtight container in the fridge for up to 4 days.
Freezing: I freeze cooked or uncooked arepas for up to 1 month. If uncooked, I lay my discs in a single layer between two pieces of parchment paper and cover them tightly with plastic wrap. If cooked, I store them in a freezer-safe container.
Reheating: I thaw frozen arepas overnight in the refrigerator. Then I cook as usual if uncooked, otherwise I reheat them in the oven at 350F, or warm them in the skillet for a crispier outside.
❓Recipe FAQs
Masarepa is what gives my arepas the most authentic texture. But if you cannot find it, you could use cornmeal, or a blend of 8.5 ounces of masa harina, 5 tablespoons of tapioca starch, 1 ¼ teaspoon of baking powder, and 5 tablespoons of gluten-free flour.
This happens when they have not had enough time to cook. To avoid this, make sure your oven and skillet are preheated before cooking, and cook until golden on the outside. The inside should be tender but never sticky. To fix this, I like returning them to the oven for a few minutes, with a few sprinkles of water on the baking tray to prevent drying out.
Yes, you can, but your outer shell will not be as crisp or golden. If you decide to do this, I recommend brushing with a tiny bit of oil before baking and flipping halfway through. The exterior will be softer and breadier, and the flavor will be milder without the stovetop browning.

Love this vegetarian side dish recipe? Please leave a 5-star rating 🌟 in the recipe below and/or a review in the comment section further down the page!
You can also FOLLOW ME on FACEBOOK, INSTAGRAM, and PINTEREST to see more delicious, healthy, family-friendly food, and if you have any questions, I’m here to help!
📋 Recipe Card
Vegan Arepas
Just give me 3 staple ingredients and 30 minutes, and voila, I have my vegan arepas! Crispy on the outside and fluffy on the inside, they are beyond simple and yet unbelievably delicious. I have made these as a snack, for breakfast, lunch, dinner, and even dessert.
Servings: 8
Calories: 199kcal
- My #1 Secret Tip for this vegan arepas recipe is to give the dough a proper chance to rest. I let it rest for the full 15 minutes. This is how I make sure that I have a lighter, fluffier end result, instead of a dense one.
- Smooth cracked edges: If the edges of my dough crack when I press them out, I make sure to smooth them out with dampened fingers. This allows for a seamless result.
- Do not make discs too thin: If they are too thin, they may not be able to be sliced open and filled.
- Cast iron for frying: I get the best results when I fry my arepas in a cast-iron skillet. It creates the crispiest crust and most even browning.
Serving: 1arepa | Calories: 199kcal | Carbohydrates: 36g | Protein: 5g | Fat: 4g | Saturated Fat: 1g | Polyunsaturated Fat: 1g | Monounsaturated Fat: 2g | Trans Fat: 0.004g | Sodium: 441mg | Potassium: 160mg | Fiber: 5g | Sugar: 1g