
This post may contain affiliate links. As an Amazon Associate, I earn from qualifying purchases. Please read my disclosure.
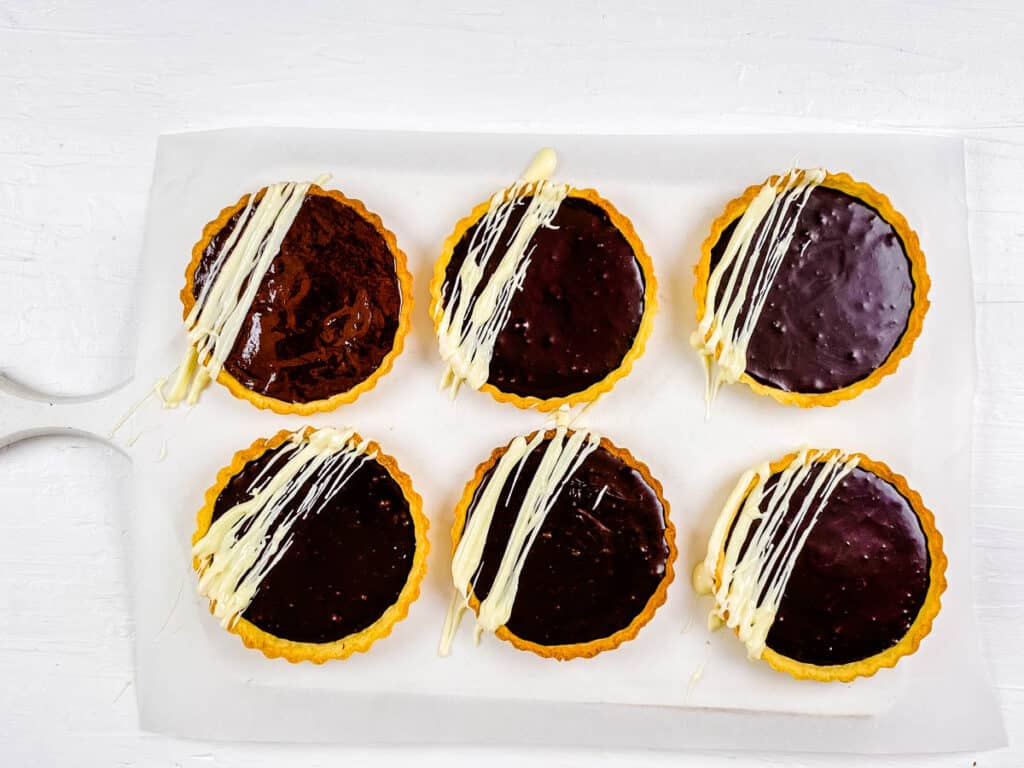
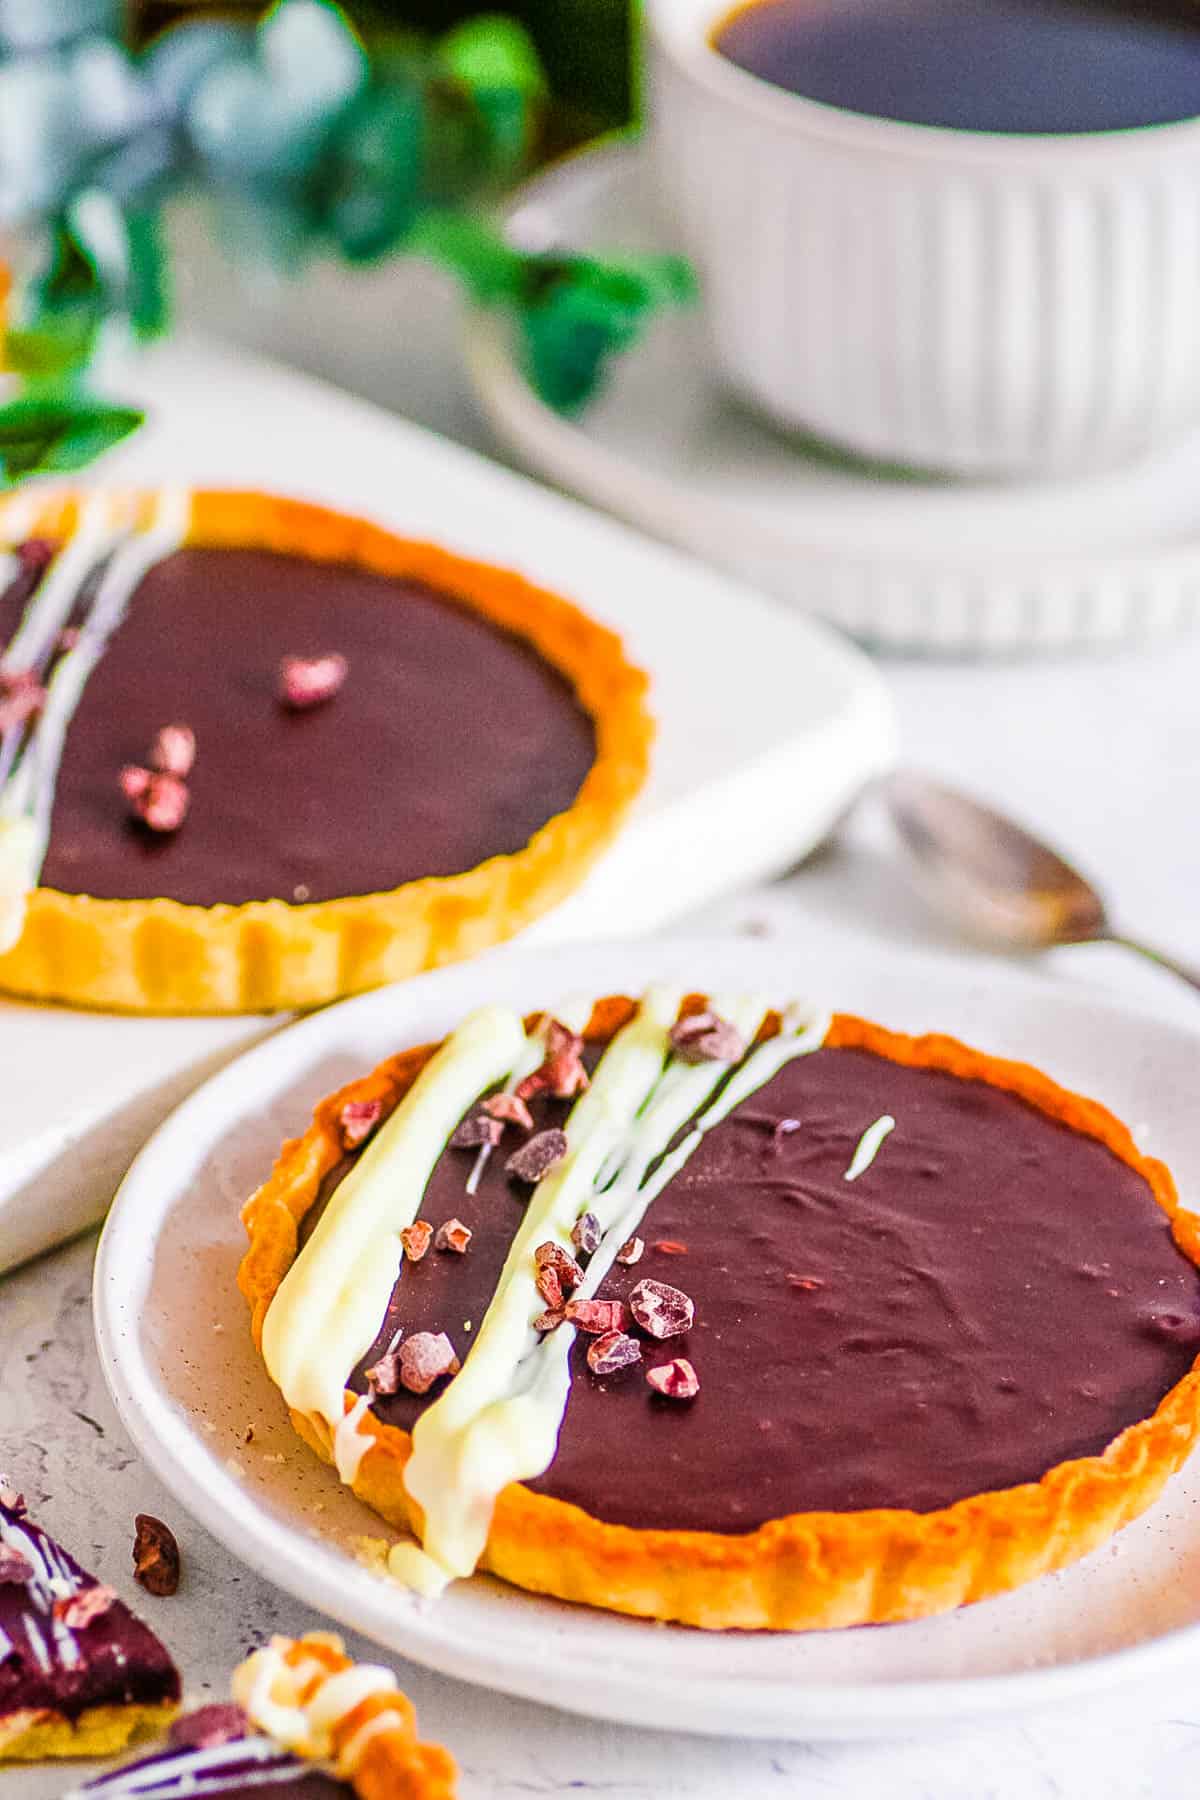
I love impressing my family and friends with these easy mini chocolate tarts. I use rich chocolate, fresh cream, and buttery pastry to make a decadent ganache filling, then finish each tartlet with a white chocolate drizzle. They are the perfect treat for Valentines Day, they melt in your mouth, and taste even better with a sprinkle of sea salt or a few fresh berries.

It is no secret that I adore all things chocolate. These individual tarts look like they came from a high end bakery, and nobody would ever guess how easy they are to make. The silky smooth ganache paired with the crisp buttery shell is really indulgent, much like my vegan chocolate truffles. 🙂
I created these tarts after a weekend of baking with friends who love chocolate as much as I do. I used semi-sweet chocolate, but you can just as easily use dark chocolate for an intense flavor or milk chocolate for a sweeter treat. These tarts freeze well and are perfect for dinner parties or celebrations. I sometimes add festive sprinkles for extra fun, and they are just as satisfying as my chocolate beet brownies with a little extra nutrition.
I love this recipe because it is quick, easy, and still decadent. Last year, I made these mini tarts as little Valentines Day treats for my friends, and they loved them because I made them myself. As a health coach, I like that I can share them with my gym focused, health conscious friends, knowing they are made with high quality ingredients.
Rolling out the buttery tart shells and pouring in the silky ganache gives me control over how the tarts turn out. Using simple, high quality ingredients keeps the process easy and the flavors balanced. I like trying different chocolates or toppings to keep each batch interesting, whether I am making them for clients or for a quick treat at home. The result is tarts that look great, taste delicious, and are ready whenever I need them.
I can confidently say this recipe is a favorite because it always gets compliments. On that same day last year, I let my kids take some to school to share with their teachers, and they were surprised to learn the tarts were homemade and not from a bakery. Ha! If you love chocolate as much as I do, try making these mini tarts yourself. You will enjoy how easy they are to make and how cute they look.
Latest Recipe Video!
🥘 Ingredients
I make these mini chocolate tarts using these simple ingredients. Here is what I use:
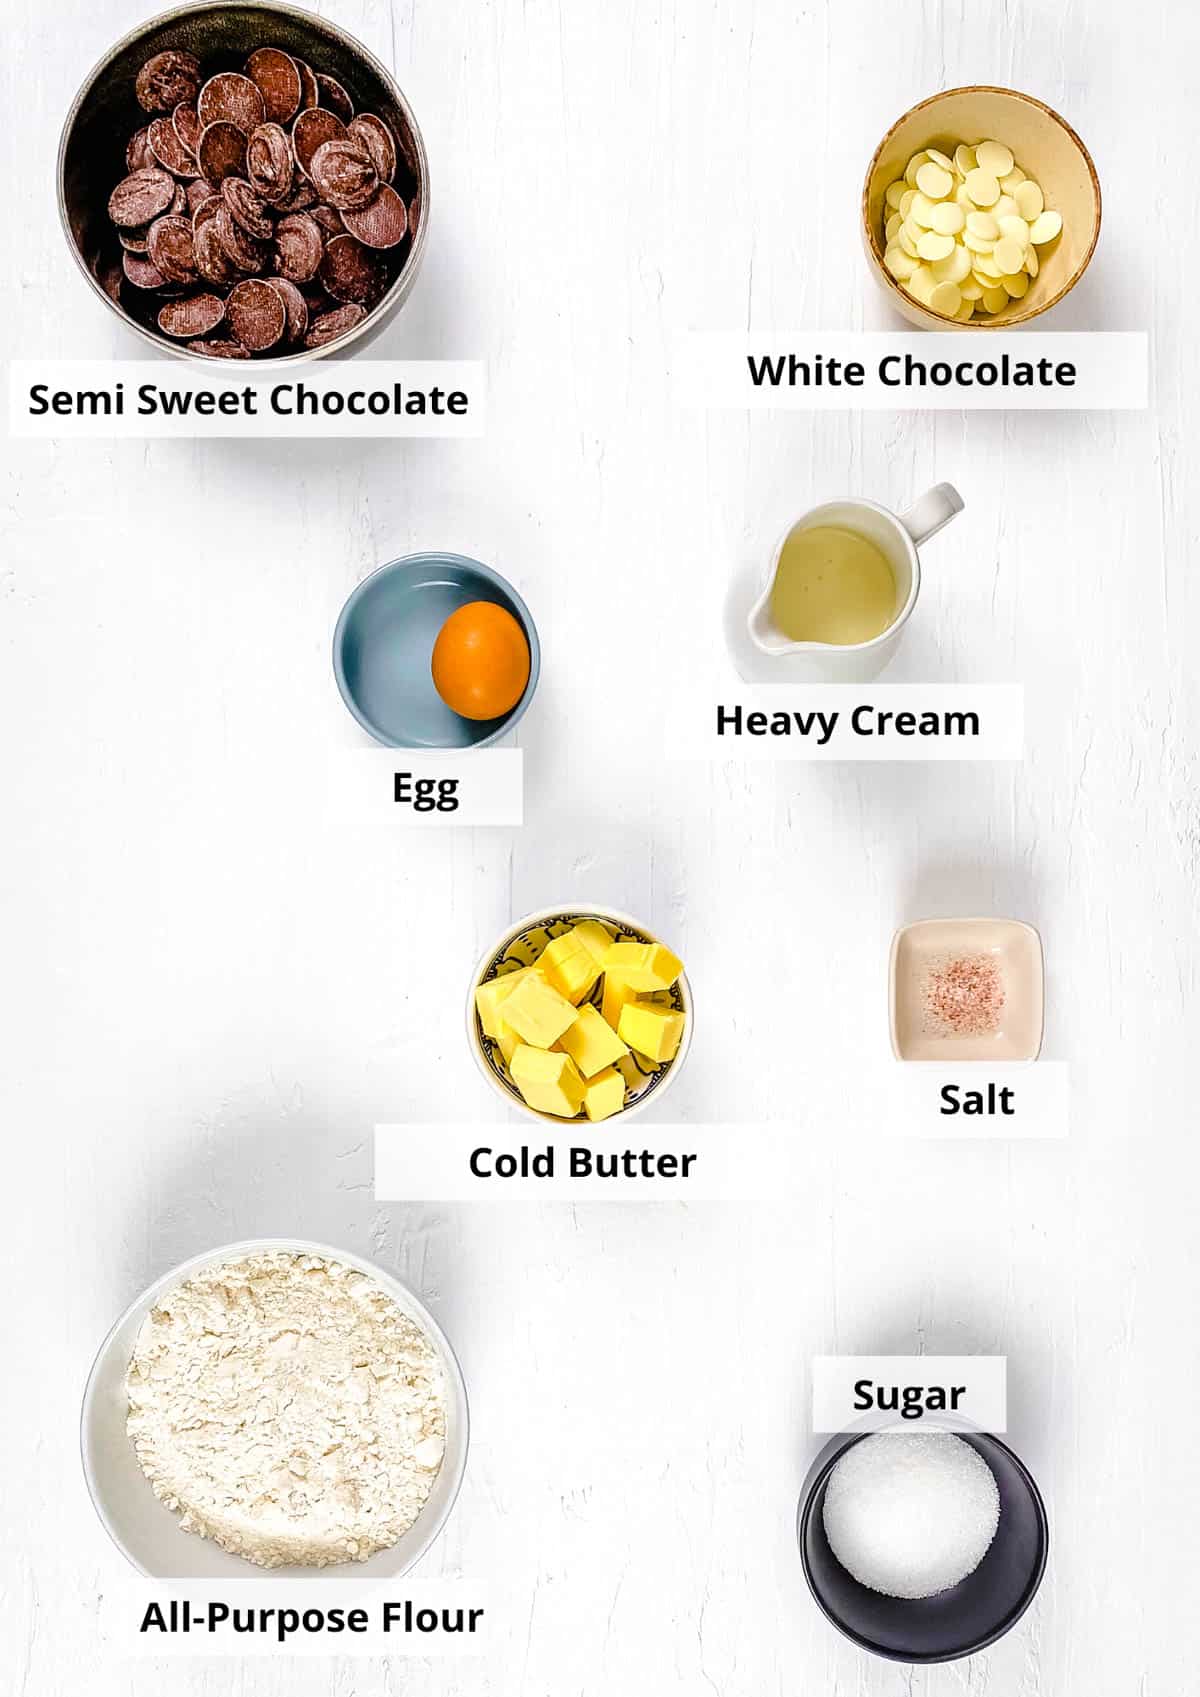
All-Purpose Flour: I use this to make the shortcrust pastry since it has just the right protein level for a crust that is sturdy yet tender.
Sugar and Salt: I add both to sweeten the pastry shells, and the salt helps bring out the sweetness even more.
Butter: I use a full stick of cold butter to create a rich, tender crust, and keeping it cold is key for the best texture.
Egg: I use 1 egg to bind everything together and give the dough structure.
Cold Water: I always use cold water to hydrate the dough, since it keeps the butter cold and helps create a flaky crust that is not tough.
Semi-Sweet Chocolate: I typically use semi-sweet chocolate, which is around 53% cacao, but I sometimes swap in dark chocolate for a more intense flavor. I prefer high-quality chocolate bars like Ghirardelli or Callebaut since bars melt more smoothly than chips.
Heavy Cream: I use heavy cream for its high fat content, which gives the ganache its silky texture.
White Chocolate: I use white chocolate for drizzling, and I like melting wafers since they melt smoothly and do not clump or harden too quickly.
🔪 How To Make
I follow these simple steps to make my yummy mini chocolate tarts:
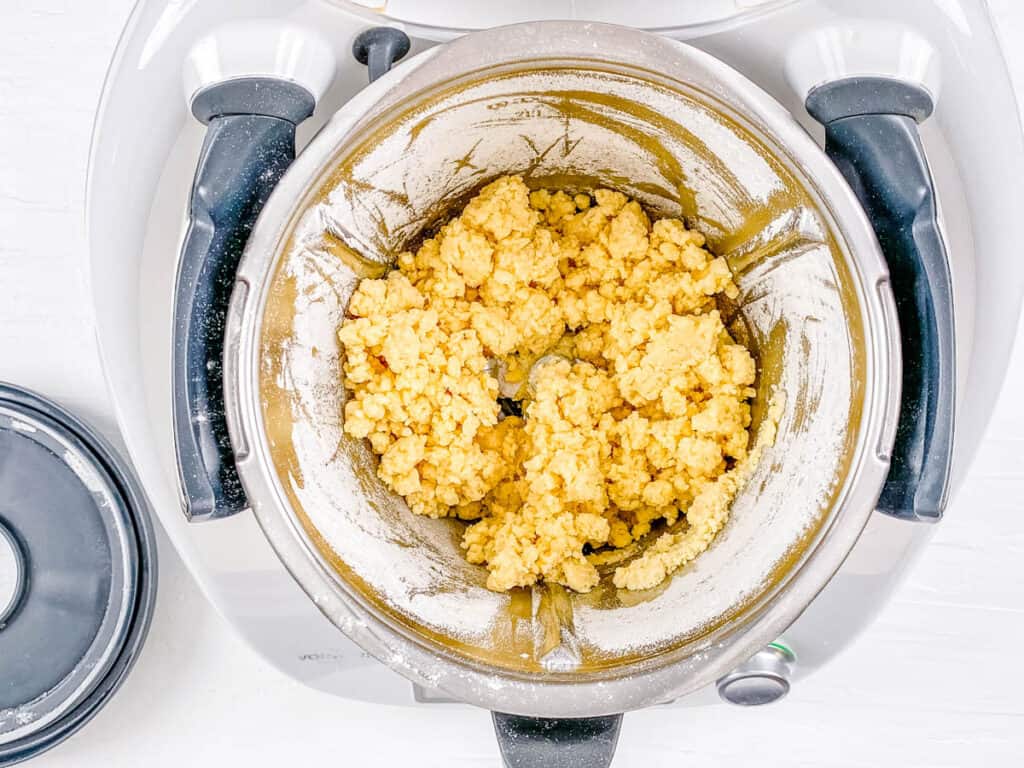
Pulse Ingredients: I add all the pastry ingredients, except the egg and water, into my food processor. I pulse everything until it looks like breadcrumbs.
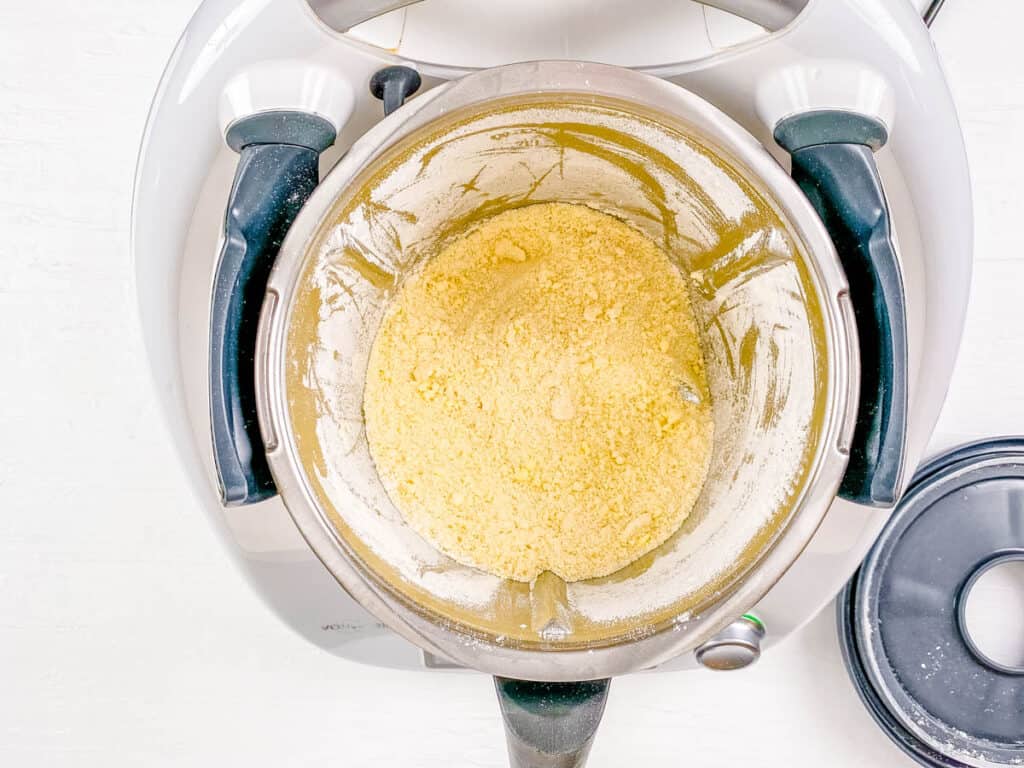
Form Dough: With the food processor running, I pour in the egg and slowly drizzle in the cold water until the dough just starts to come together in a ball.
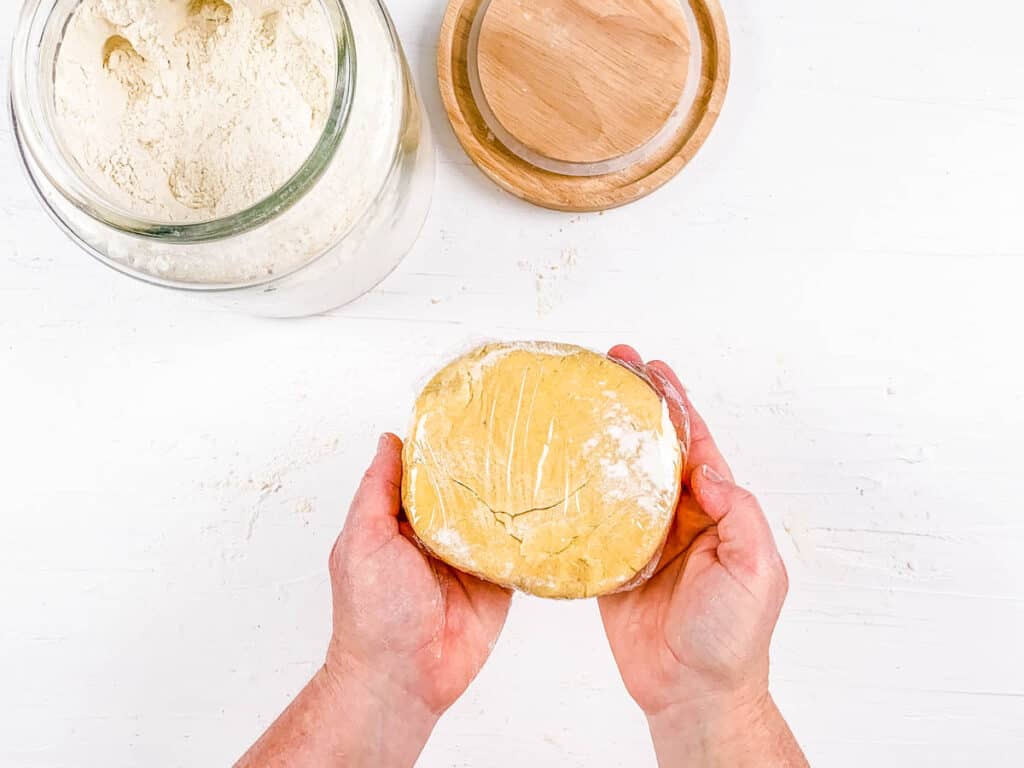
Chill Dough: I transfer the dough to a lightly floured work surface and use my hands to form it into a ball. I gently press it into a disc, wrap it in plastic wrap, and chill it for 30 to 45 minutes.
Spray Tart Pan, Roll Out The Dough: I spray the tart tins with nonstick cooking spray and preheat my oven to 320 degrees Fahrenheit. I clean my work area, dust it with flour, and roll the pastry dough out to about 1/8 of an inch thick.
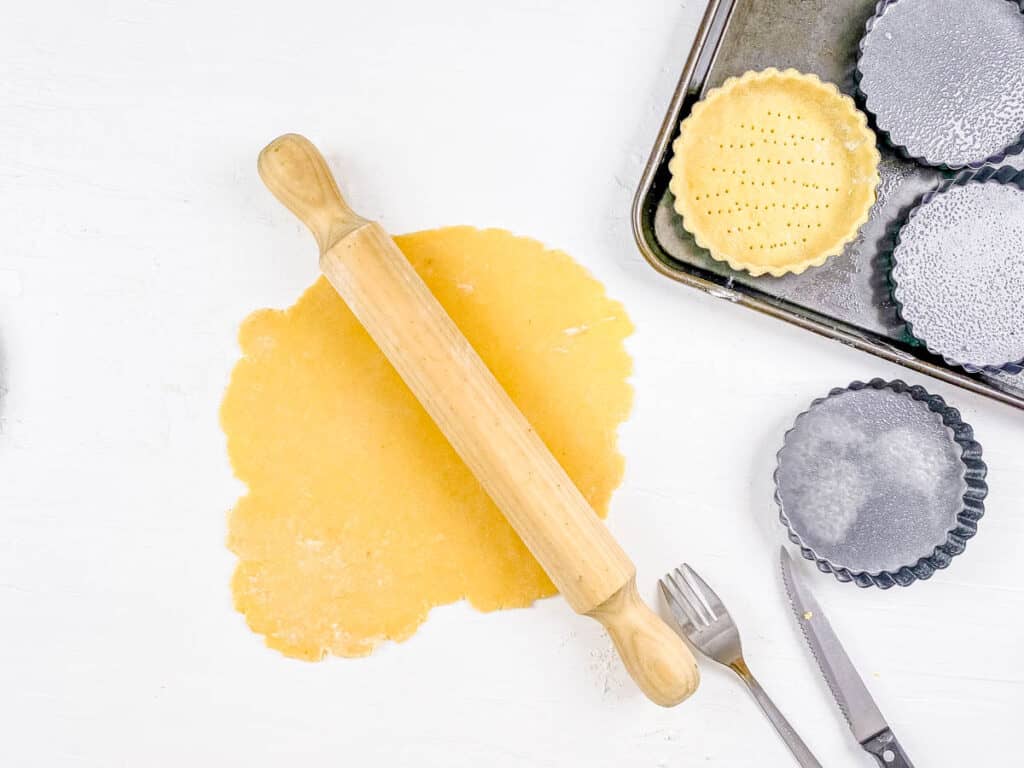
Shape Dough: I cut the dough into circles slightly larger than the tart pans.

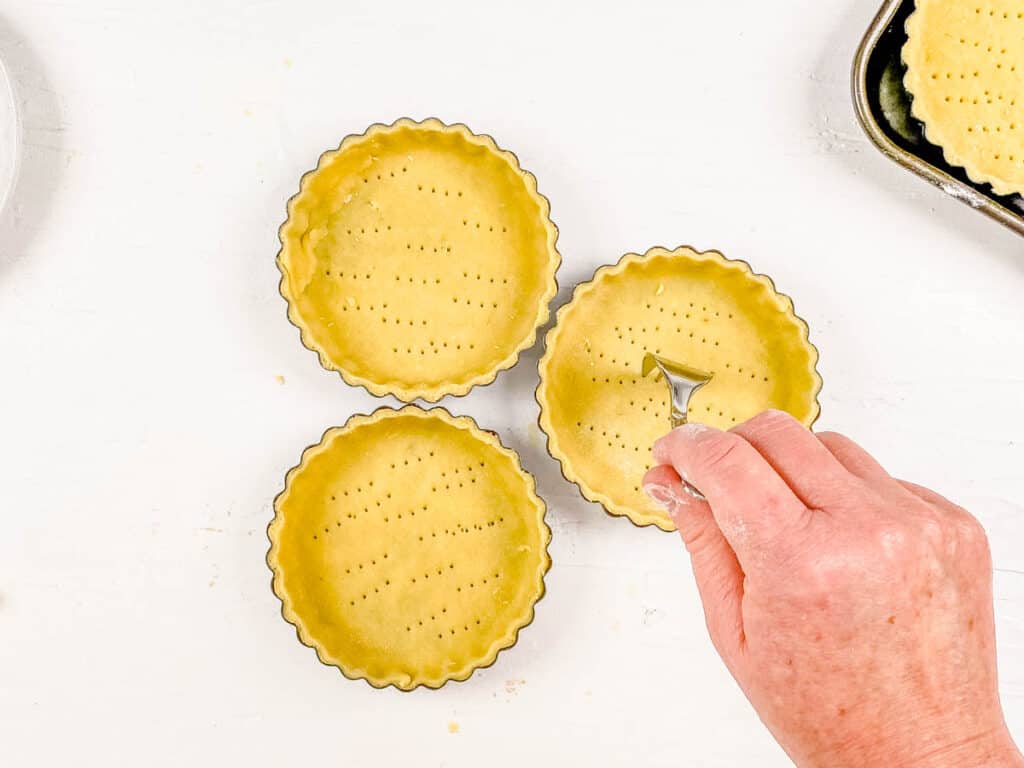
Fill Tart Pans: I place each dough circle into the tart pans and gently press the dough down to remove any air bubbles. I use a fork to poke holes in the bottom, then trim any excess pastry from the edges with a sharp knife.
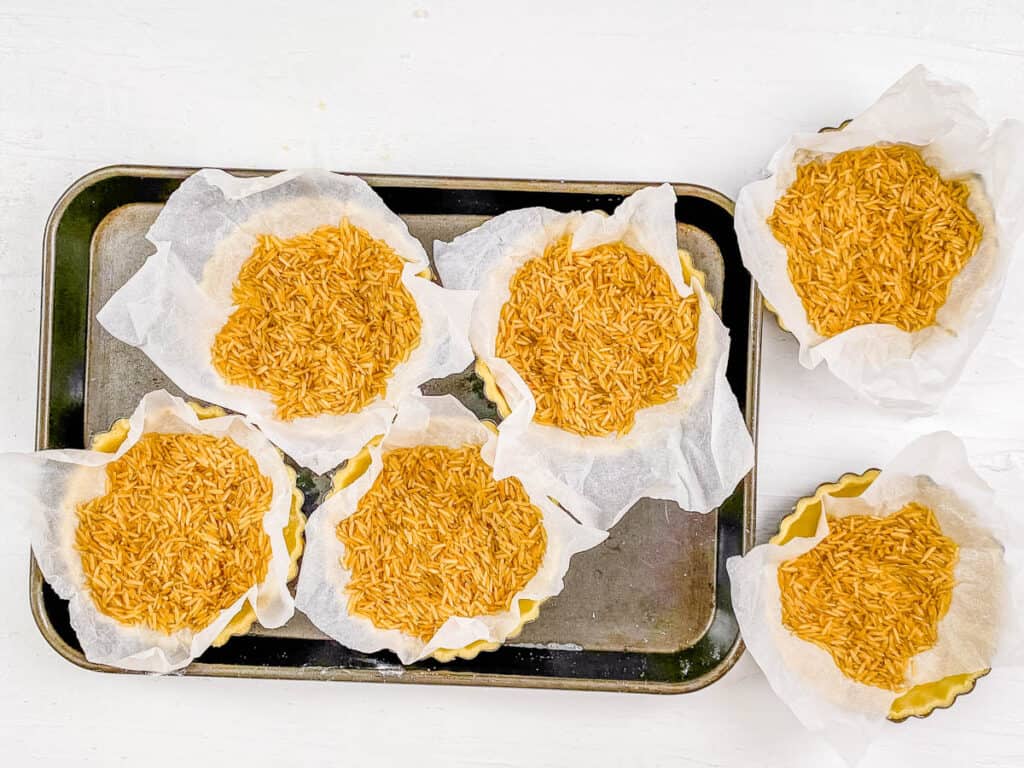
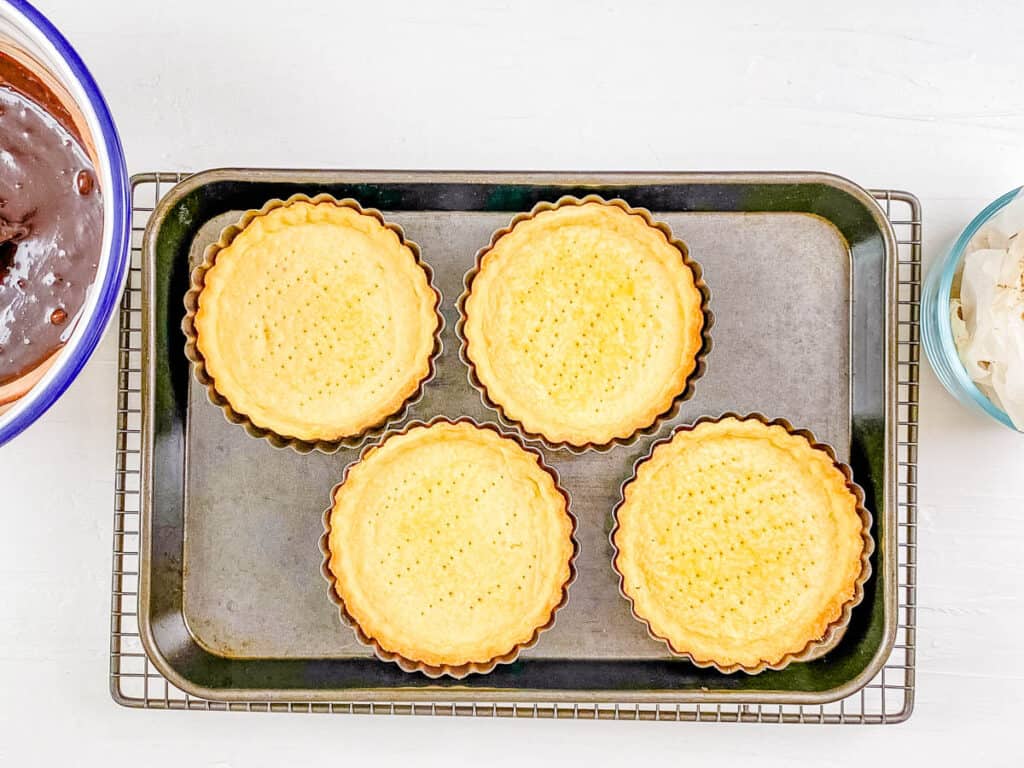
Bake Tart Shells: I place a small piece of parchment paper into each pastry crust and fill it with rice. I set the tartlet shells on a baking sheet and bake them for 15 to 20 minutes, until they are lightly golden brown.
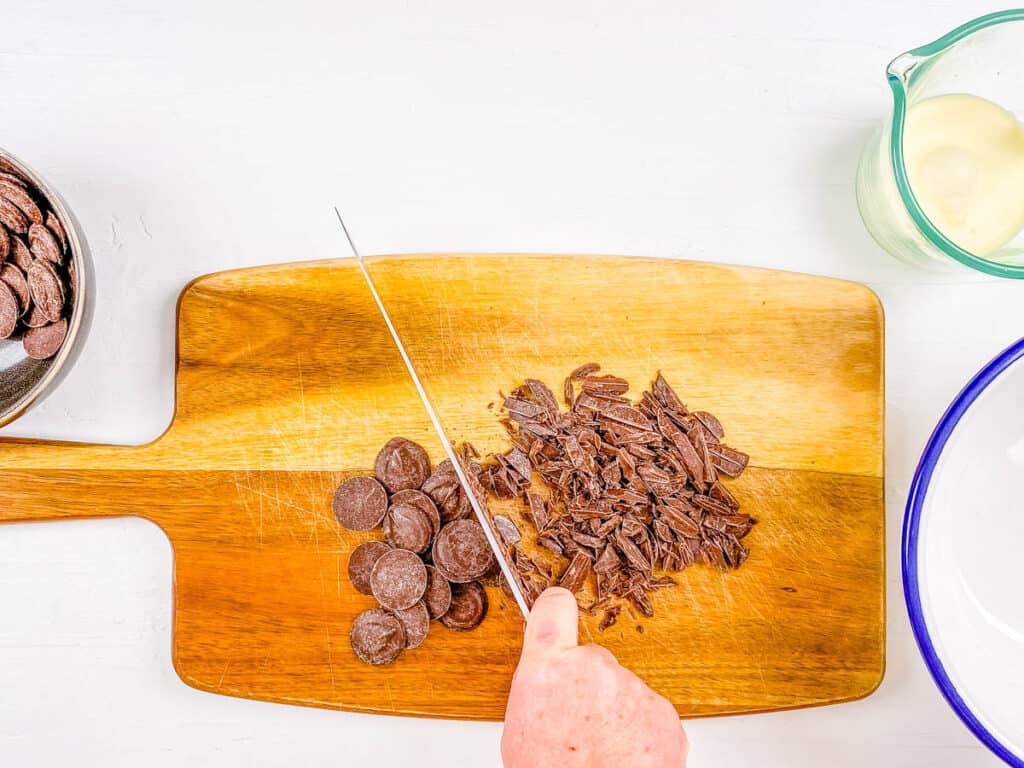
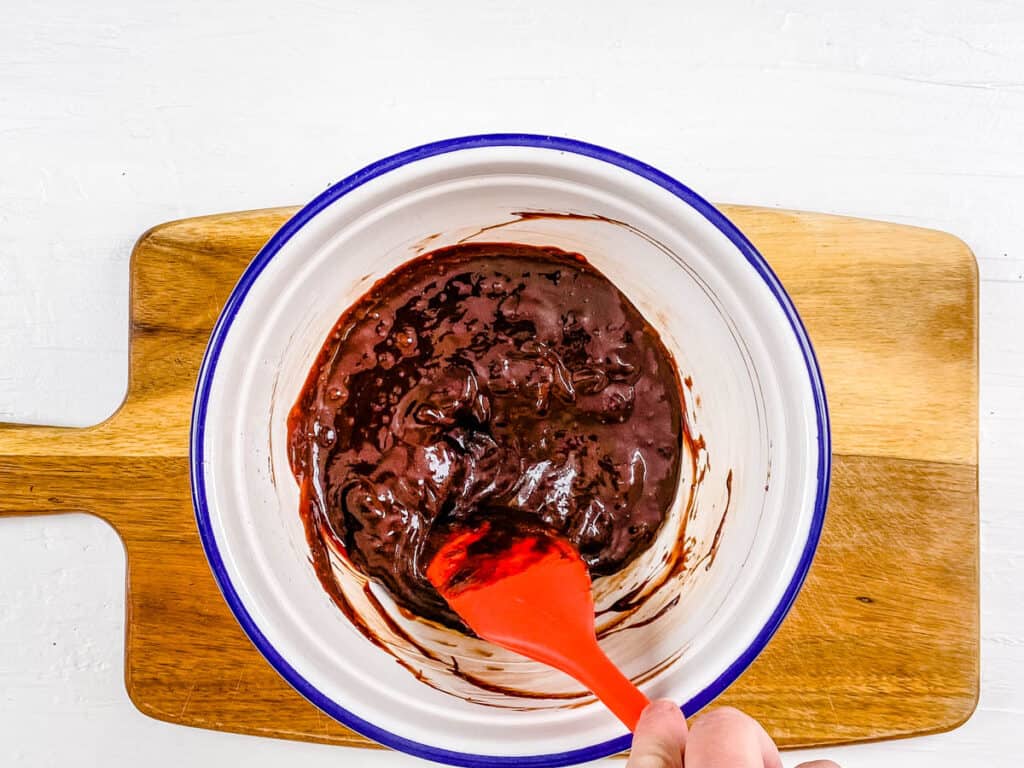
Chop Chocolate: I finely chop the chocolate and place it into a large bowl.
Add Cream: I heat the cream in a microwave-safe glass until it starts to bubble without overflowing, or I warm it in a small saucepan over medium heat. I pour the hot cream over the chocolate and let it sit for 30 seconds, then stir with a rubber spatula until completely smooth.
Remove From Oven: I pull the pastry crusts out of the oven and place them on a wire rack.
Fill Mini Chocolate Tart Shells: I pour the chocolate mixture into the cooled tart shells.
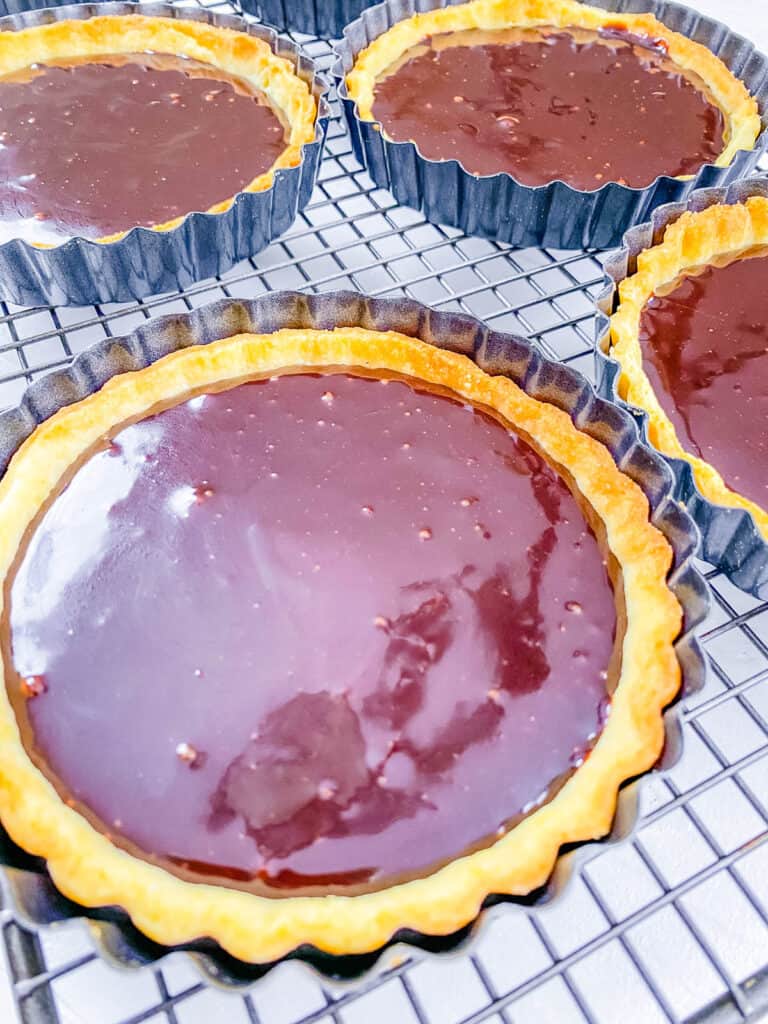
Chill and Serve: I place the chocolate tarts in the fridge for at least 2 hours, preferably overnight. Once they are fully set, I drizzle the tops with white chocolate and enjoy.
My #1 Secret Tip for this recipe is to chill the dough before rolling it out. I always do this because cold dough is much easier to handle and rarely sticks or tears. Chilling also keeps the butter solid, which gives the crust a tender flaky texture that stay firm perfectly while baking. Doing this makes the whole process less stressful for me and means my family and friends always get consistent, delicious treats every time.
Other Tips To Keep In Mind:
- Use Quality Chocolate: I use a good-quality chocolate bar instead of chips. It melts more smoothly and makes the ganache taste richer. Using chocolate that I enjoy eating makes the tarts taste even more decadent.
- Measure Carefully: I measure all my ingredients precisely, especially flour and butter. It keeps the pastry texture just right every time. Taking the time to measure properly saves me from having to redo the dough.
- Cool Ganache Slightly: I let the ganache cool a little before pouring it into the shells. This prevents the filling from spilling over the edges.
- Add Toppings Last: I only add sprinkles, berries, or drizzles after the tarts have set. It keeps the decorations looking fresh and pretty. Waiting until the end makes the tarts look more polished and store better if I need to keep them for later.
📖 Variations
I love how easy it is to customize these baked mini chocolate tarts, since there are so many ways to make this dessert your own. I always try one of these droolworthy variations:
Choco Milk: I use 200 grams of milk chocolate to make the ganache smoother and sweeter. This version is always a hit with kids and picky eaters.
Salted: I sprinkle 1/2 teaspoon of flaky sea salt on top after baking. The salty crunch balances the rich chocolate perfectly.
Caramel Drizzle: I drizzle 1/3 cup of my vegan caramel sauce over the cooled tarts. This adds a creamy finish and makes them great for parties and celebrations.
🍽 Serving Suggestions
I like serving this chocolate ganache tart with a slice of chocolate walnut cake, a rich layered cake topped with ganache, or a few white chocolate and raspberry blondies. The moist texture of the chocolate walnut cake pairs well with the dense, smooth ganache in the tart, and the blondies add a contrasting fruity note that balances the deep chocolate flavor. Yum!
I also enjoy pairing the mini chocolate tarts with a cup of oatmilk honey latte, a creamy coffee with a hint of vanilla. I love the warm flavor that enhances the chocolate ganache. Another easy option is a glass of my healthy hot chocolate, a rich chocolate drink with warming spices, so good.
🧊 Storage Directions
Refrigeration: I make the tart as directed and let it cool completely before covering it with plastic wrap. I store it in the fridge for up to 1 week, and when I am ready to serve, I let it sit at room temperature for a bit so the ganache softens.
Freezing: After the tart has fully cooled, I wrap it well in plastic wrap and then in foil before placing it in the freezer. I also like to freeze individual slices wrapped the same way so I can enjoy a portion whenever I want. When I am ready to serve, I let it thaw in the fridge overnight so the texture comes back without condensation or sogginess.
Reheating: About 30 minutes before serving, I take the chilled tart out of the fridge so it can come to room temperature.
❓ Recipe FAQs
I notice my ganache turns grainy when the cream gets too hot or I pour it too quickly over the chocolate. I make sure to heat the cream just until steaming and add it slowly while stirring gently so the chocolate melts evenly and the ganache stays creamy.
I see my ganache become too thin when the mixture is still warm or I misjudge the cream-to-chocolate ratio. I let it cool for a short while and sometimes chill it slightly before spreading so it thickens into a rich texture that holds its shape.
I have had ganache separate when the chocolate and cream were not fully combined or when it overheated. I fix it by stirring slowly and continuously until smooth, then letting it cool to the right temperature before spreading so it stays creamy, rich, and stable on the tart.

Love this healthy dessert recipe? Please leave a 5-star rating 🌟 in the recipe below and/or a review in the comment section further down the page!
You can also FOLLOW ME on FACEBOOK, INSTAGRAM, and PINTEREST to see more delicious, healthy, family-friendly food, and if you have any questions, I’m here to help!
📋 Recipe Card
Mini Chocolate Tarts
I love impressing my family and friends with these easy mini chocolate tarts. I use rich chocolate, fresh cream, and buttery pastry to make a decadent ganache filling, then finish each tartlet with a white chocolate drizzle. They are the perfect treat for Valentines Day, they melt in your mouth, and taste even better with a sprinkle of sea salt or a few fresh berries.
Servings: 6 tarts
Calories: 354kcal
- My #1 Secret Tip for this recipe is to chill the dough before rolling it out. I always do this because cold dough is much easier to handle and rarely sticks or tears. Chilling also keeps the butter solid, which gives the crust a tender, flaky texture that holds its shape perfectly while baking. Doing this makes the whole process less stressful for me and means my family and friends always get consistent, delicious results every time.
- Use Quality Chocolate: I use a good-quality chocolate bar instead of chips. It melts more smoothly and makes the ganache taste richer. Using chocolate that I truly enjoy eating makes the tarts taste even more decadent.
- Measure Carefully: I measure all my ingredients precisely, especially flour and butter. It keeps the pastry texture just right every time. Taking the time to measure properly saves me from having to redo the dough.
- Cool Ganache Slightly: I let the ganache cool a little before pouring it into the shells. This prevents the filling from spilling over the edges. I also find that it gives the ganache a thicker, creamier texture that sets beautifully.
- Add Toppings Last: I only add sprinkles, berries, or drizzles after the tarts have set. It keeps the decorations looking fresh and pretty. Waiting until the end makes the tarts look more polished and store better if I need to keep them for later.
Serving: 0.5tart | Calories: 354kcal | Carbohydrates: 31g | Protein: 4g | Fat: 24g | Saturated Fat: 14g | Polyunsaturated Fat: 1g | Monounsaturated Fat: 7g | Trans Fat: 0.3g | Cholesterol: 53mg | Sodium: 100mg | Potassium: 183mg | Fiber: 2g | Sugar: 16g